
For this week, we learned different types of sensors. There are so many of them!
For me, the most relevant is probably the capactive sensor. I first experimented with two simple objects, then LED lights.
The interactive board I'm thinking to do is closely related to this capacitive sensor. When I put a jar/cube on the board, it detects its presence and react accordingly.
I tried to make it but it didn't work and I'm hoping to make it work in the following week.
I also experiemented with other sensors like ultrasonic sensor, flex sensor, and even paper based controller. Beyond the simple tutorial I found online, I also tried to combine them with LED lights and sound (which is what my final project will be)
Then I used series monitor to track its changes and see the number range. I also connected flex sensor with a LED light to see how it changes its brightness.
Another thing I tried is to use ultrasonic sensor. This ultrasonic sensor HC-SR04 is to measure the distance to an object by using ultrasonic waves. VCC pin is to connect with voltage, 5V. GND pin is to connect to the ground, 0V. TRIG pin is to receive the control signal (pulse) from Arduino. ECHO pin is to send a signal (pulse) to Arduino. Arduino measures the duration of pulse to calculate distance.
Then I want to go beyond the simple tutorial online. I wired ultrasonic sensor with Piezo Buzzer to play a jungle bells song and also make the LED light up.
I also experiemented with other sensors like ultrasonic sensor, flex sensor, and even paper based controller. Beyond the simple tutorial I found online, I also tried to combine them with LED lights and sound (which is what my final project will be)
I. Capacitive sensor
1.1 Proximity distance for two objects
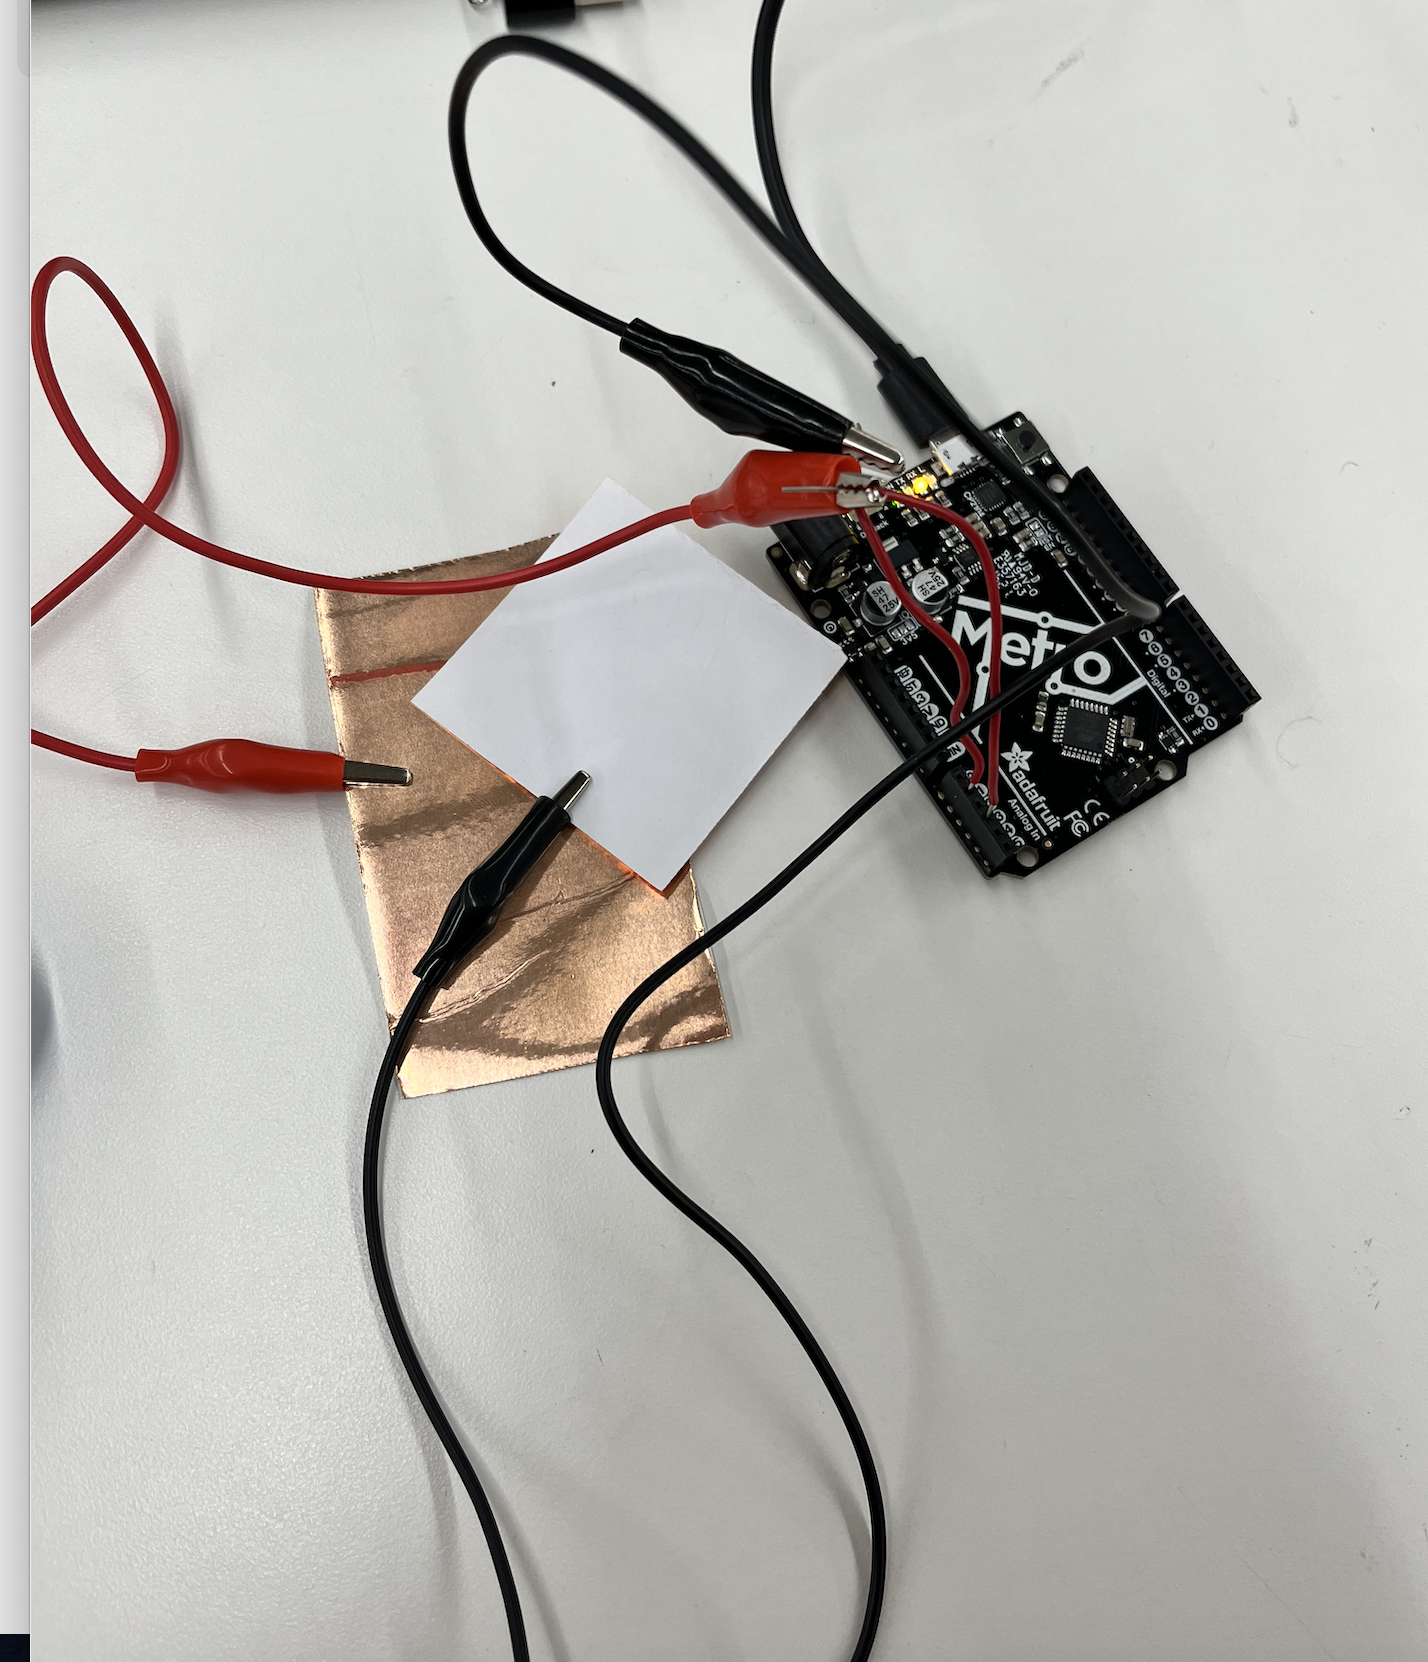
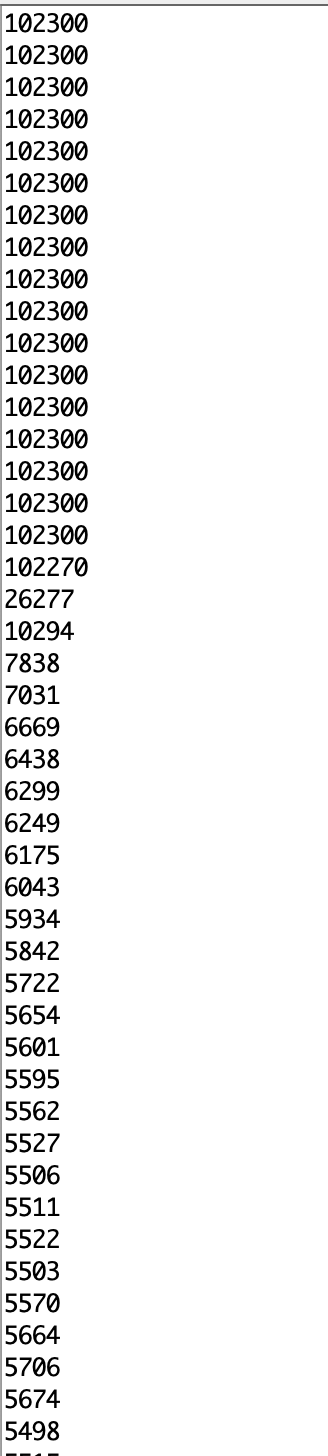
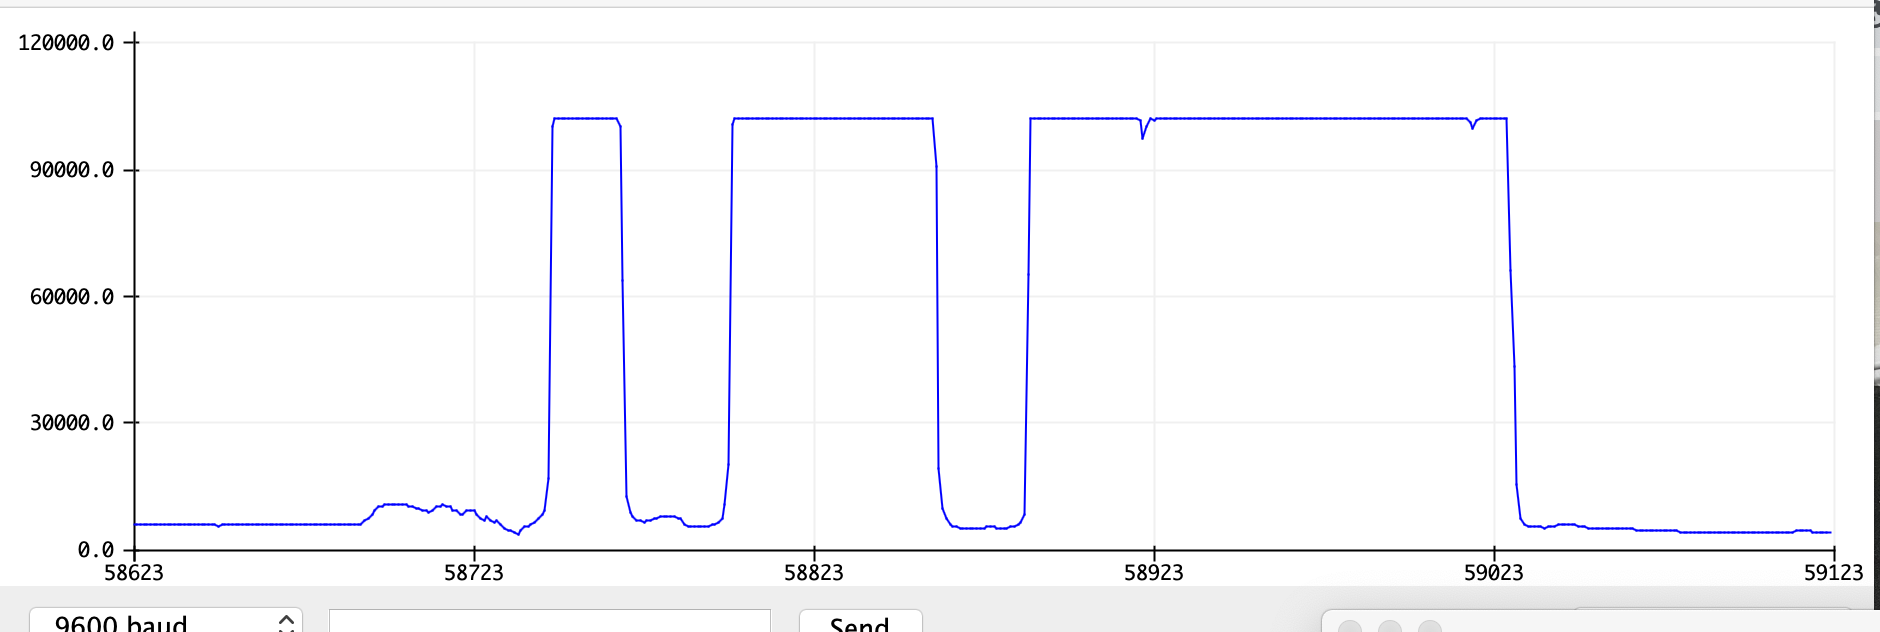
I wanted to use this capacitive sensor for my final project. The first part is to actually detect whether two objects are touching or not. So I used the code from class with a little bit modification. This is the wire I had (can ignore the 5V and ground, as I took the picture after) And also the serial plotter I had.
Wire
Series Monitor
Series Plotter
Arduino code for capactive sensor two objects
//tx_rx03  Robert Hart Mar 2019.
//  Program to use transmit-receive across space between two conductors.
//  One conductor attached to digital pin, another to analog pin.
//
//  This program has a function "tx_rx() which returns the value in a long integer.
//
//  Optionally, two resistors (1 MOhm or greater) can be placed between 5V and GND, with
//  the signal connected between them so that the steady-state voltage is 2.5 Volts.
//
//  Signal varies with electric field coupling between conductors, and can
//  be used to measure many things related to position, overlap, and intervening material
//  between the two conductors.
//


long result;   //variable for the result of the tx_rx measurement.
int analog_pin = A3;
int tx_pin = A1;
int ledPin = 2; // sets the LED @pin 2

void setup() {
pinMode(tx_pin,OUTPUT);      //Pin 4 provides the voltage step
pinMode(ledPin, OUTPUT);  //sets the led as output
Serial.begin(9600);
}


long tx_rx(){         //Function to execute rx_tx algorithm and return a value
                      //that depends on coupling of two electrodes.
                      //Value returned is a long integer.
  int read_high;
  int read_low;
  int diff;
  long int sum;
  int N_samples = 100;    //Number of samples to take.  Larger number slows it down, but reduces scatter.

  sum = 0;

  for (int i = 0; i < N_samples; i++){
   digitalWrite(tx_pin,HIGH);              //Step the voltage high on conductor 1.
   read_high = analogRead(analog_pin);        //Measure response of conductor 2.
   delayMicroseconds(100);            //Delay to reach steady state.
   digitalWrite(tx_pin,LOW);               //Step the voltage to zero on conductor 1.
   read_low = analogRead(analog_pin);         //Measure response of conductor 2.
   diff = read_high - read_low;       //desired answer is the difference between high and low.
 sum += diff;                       //Sums up N_samples of these measurements.
 }
  return sum;
}                         //End of tx_rx function.


void loop() {

result = tx_rx();
Serial.println(result);
//delay(100);
//
//if (tx_pin== HIGH){      //if sensor is HIGH
//    digitalWrite(ledPin, HIGH);   //LED will turn ON
//  }
//  else{       //otherwise
//    digitalWrite(ledPin,LOW); //LED is turned OFF
//  }
//  delay(300);   //delay of 300milliseconds
//


}
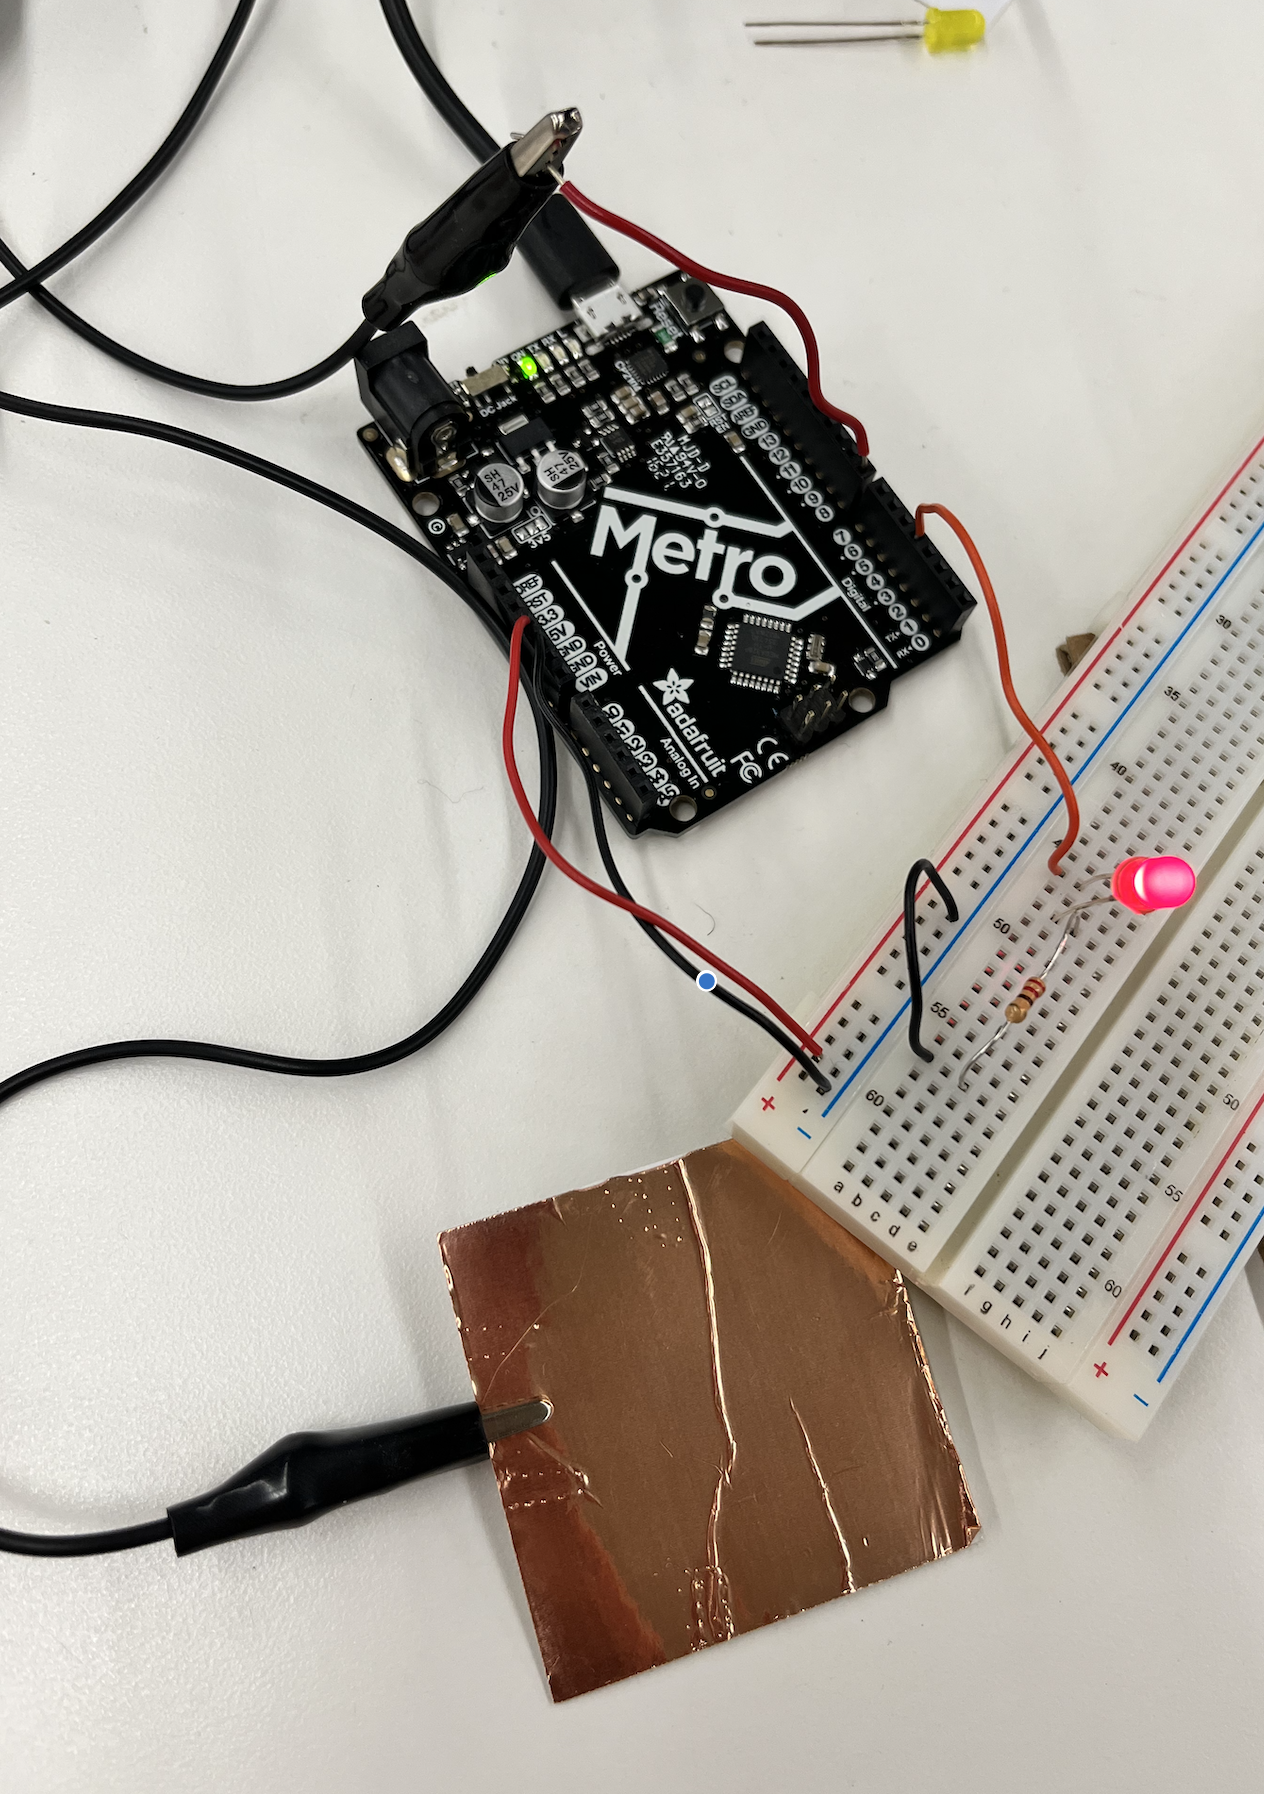
1.2 Touch with LED
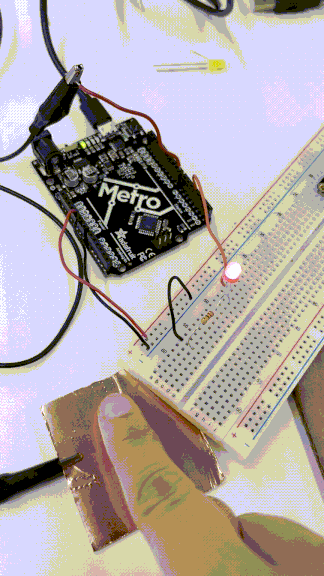
Then I tried to control LED light with the capactivie sensor. So when I touch the sensor, the LED light light up/changes its brightness.
Touch LED light Gif
Single Touch LED light
1.2 Arduino code for capactive sensor for LED
This is the arduino code I used. I need to include capactivesensor library to make it work.
            #include

              CapacitiveSensor   cs_4_8 = CapacitiveSensor(4,8); // 1M resistor between pins 4 & 8, pin 8 is sensor pin, add a wire and or foil

              void setup()
              {
                 cs_4_8.set_CS_AutocaL_Millis(0xFFFFFFFF);// turn off autocalibrate on channel 1 - just as an example
                 Serial.begin(9600);
                 pinMode(7,OUTPUT);
              }

              void loop()
              {
              long sensor1 =  cs_4_8.capacitiveSensor(50);

                  Serial.println(sensor1);  // print sensor output
                 if(sensor1 >= 1000)
                 {
                  digitalWrite(7,HIGH);
                 }
                 else{
                  digitalWrite(7,LOW);
                 }
              }
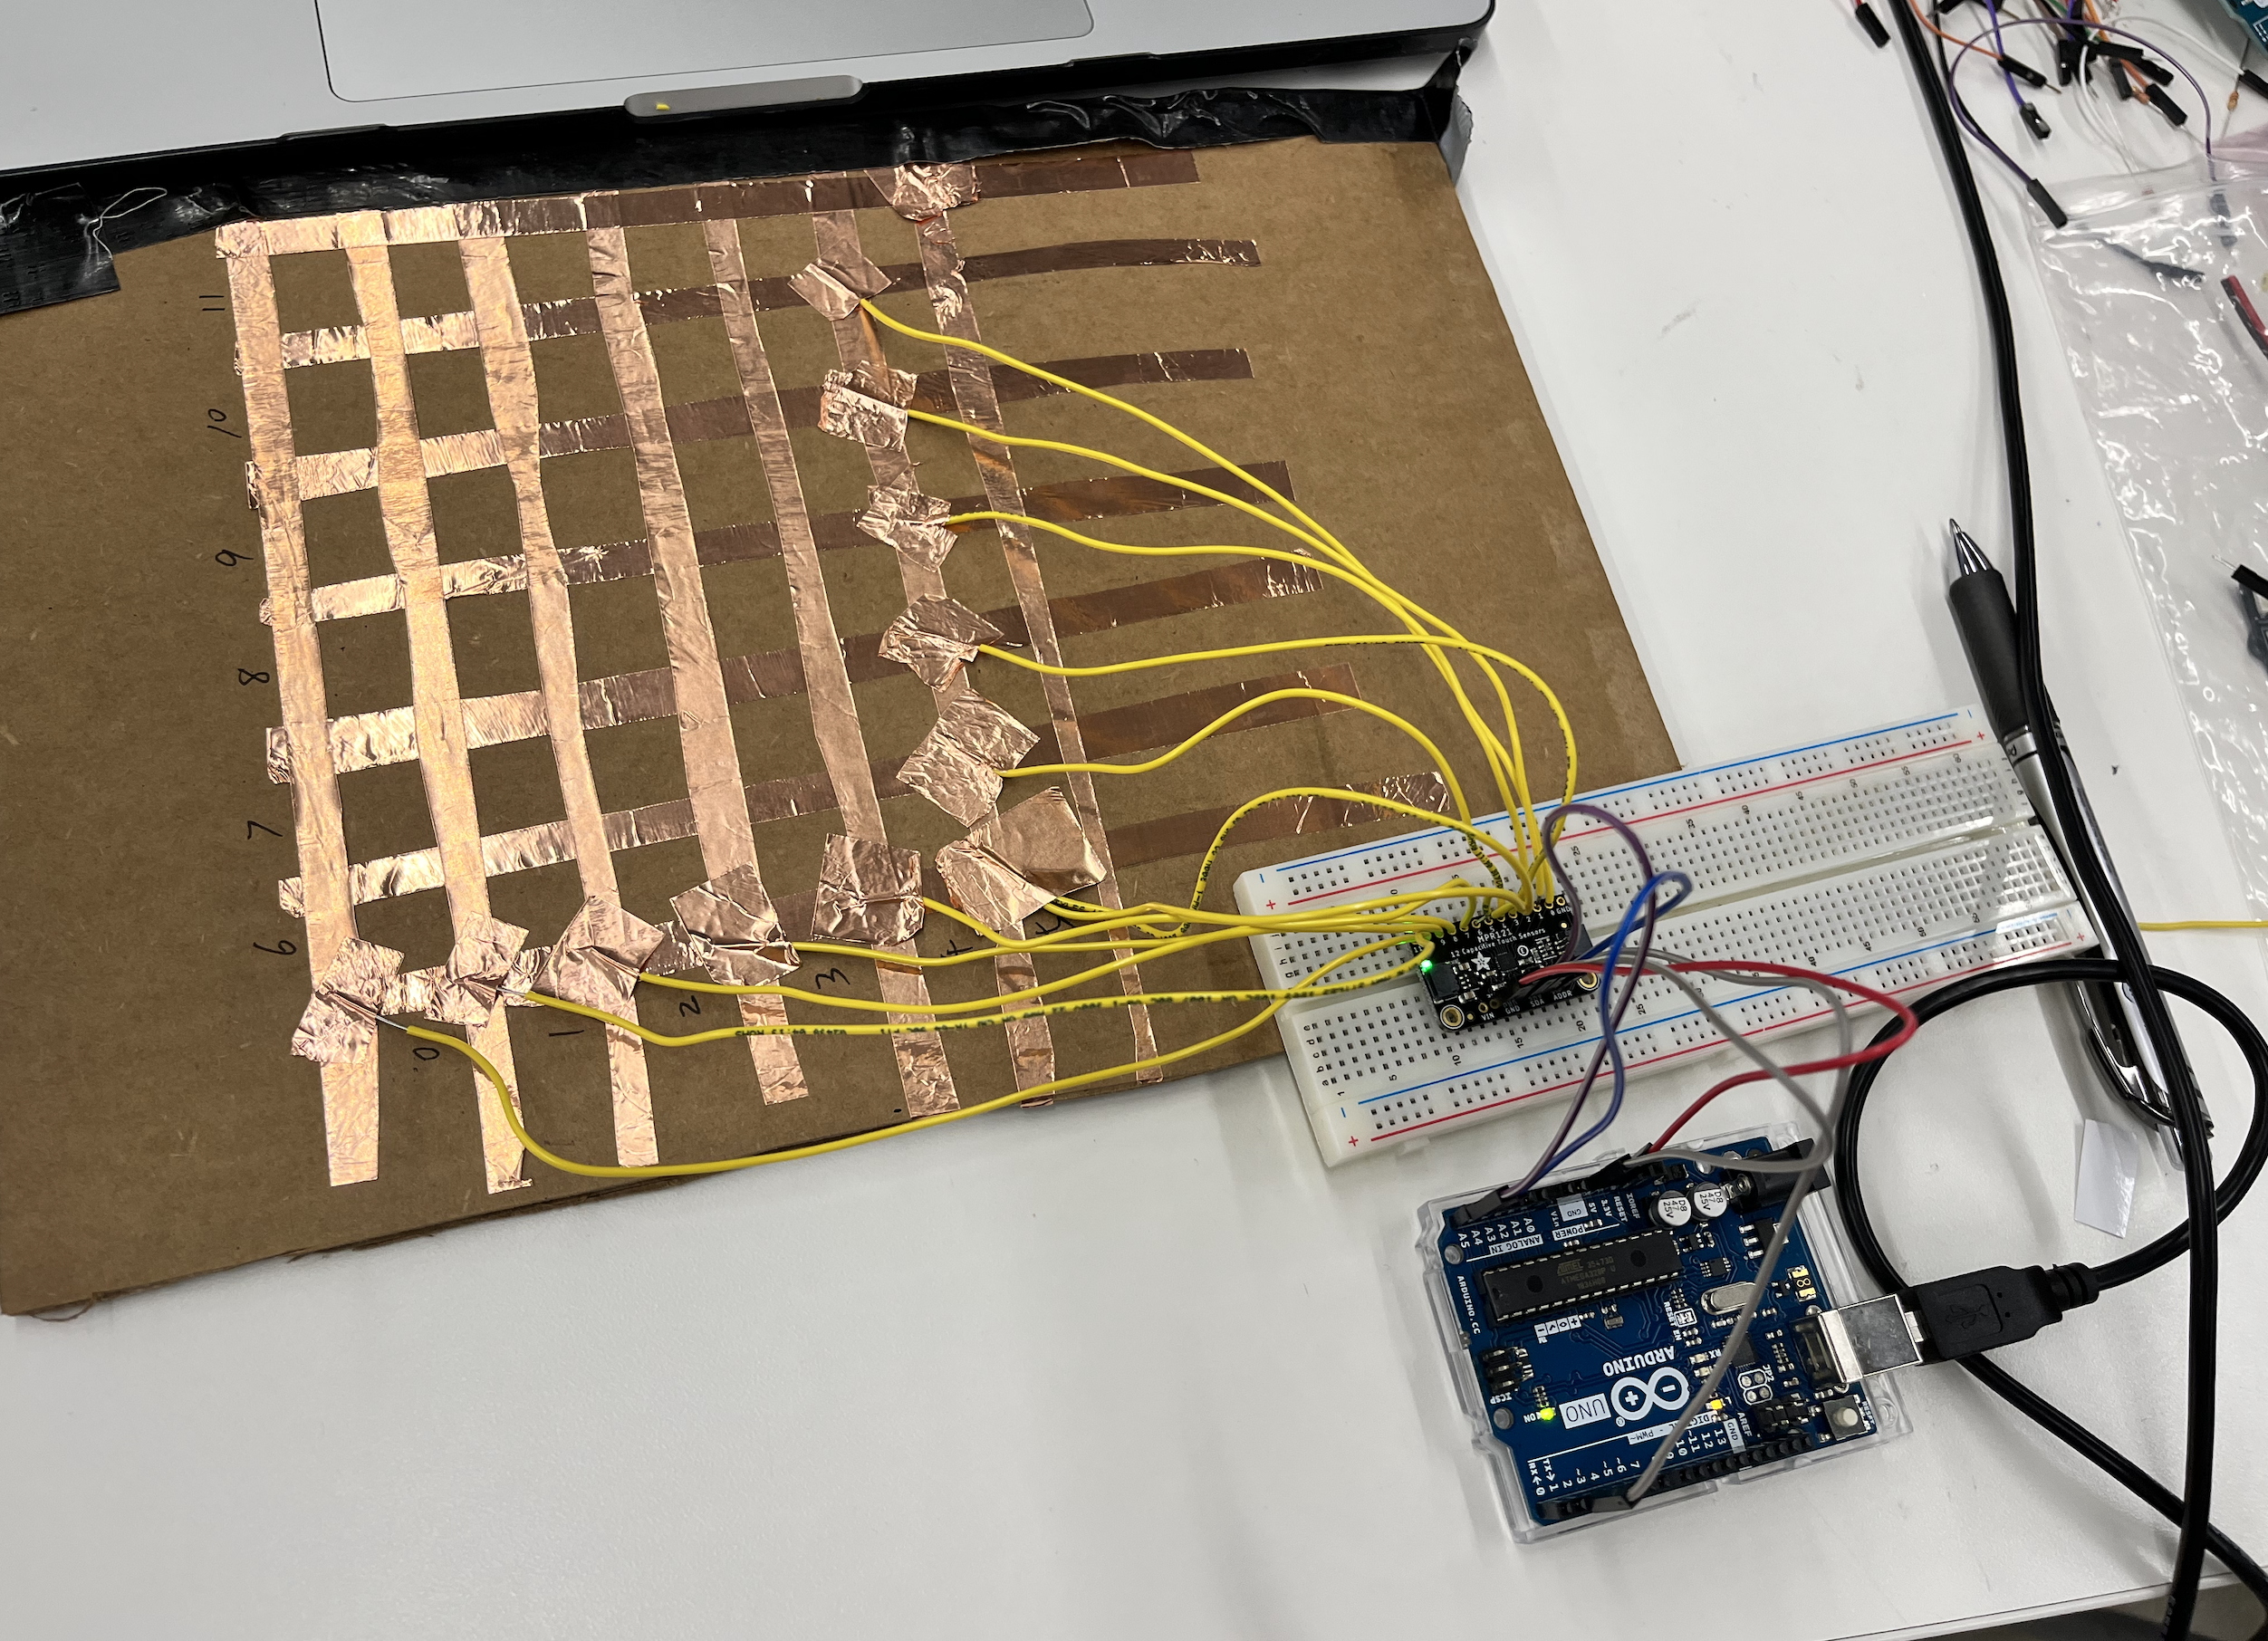
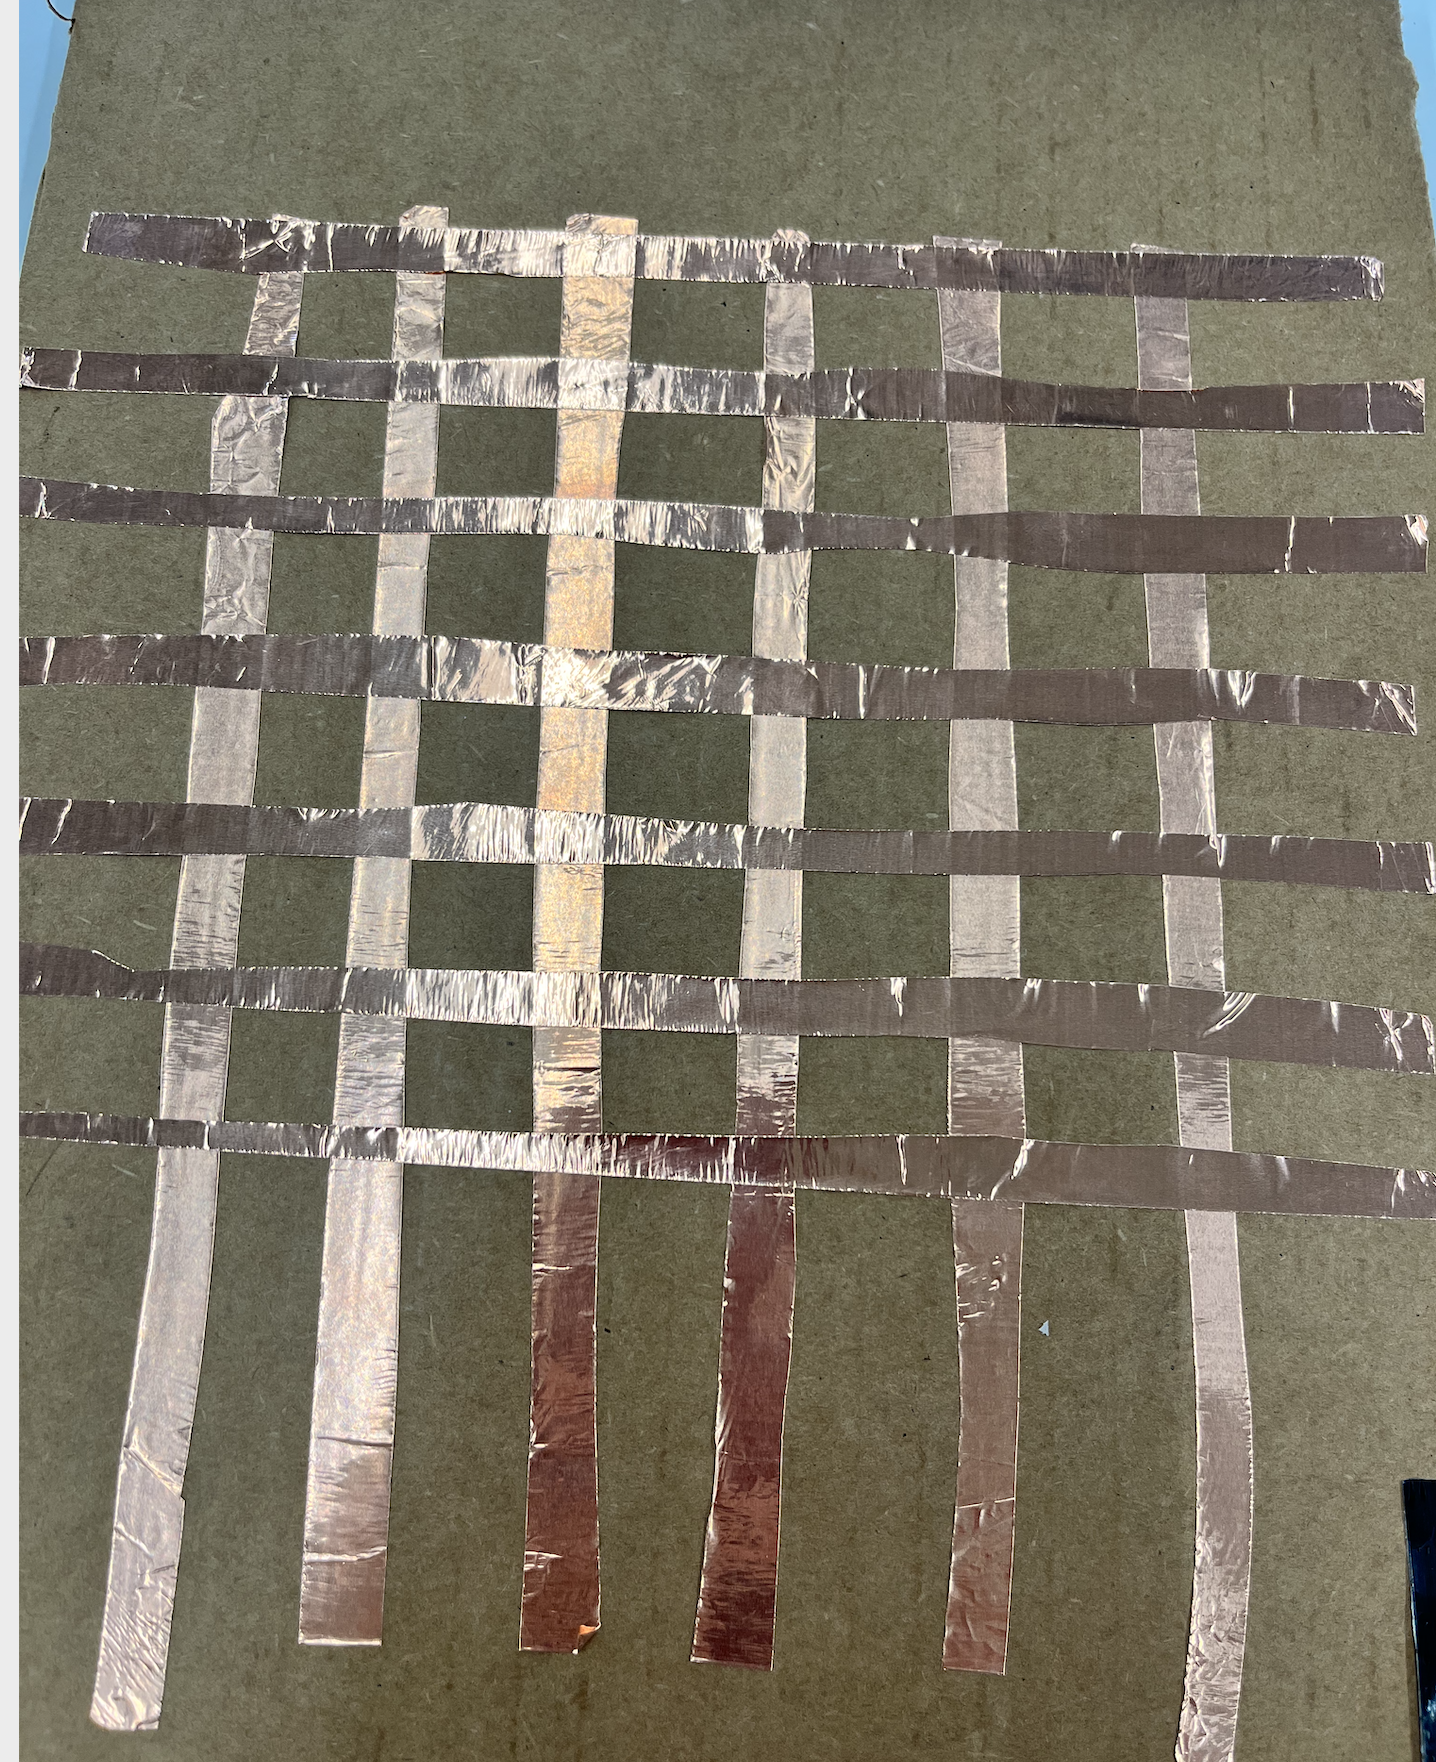
1.3 CapactiveSensor- Interactive board
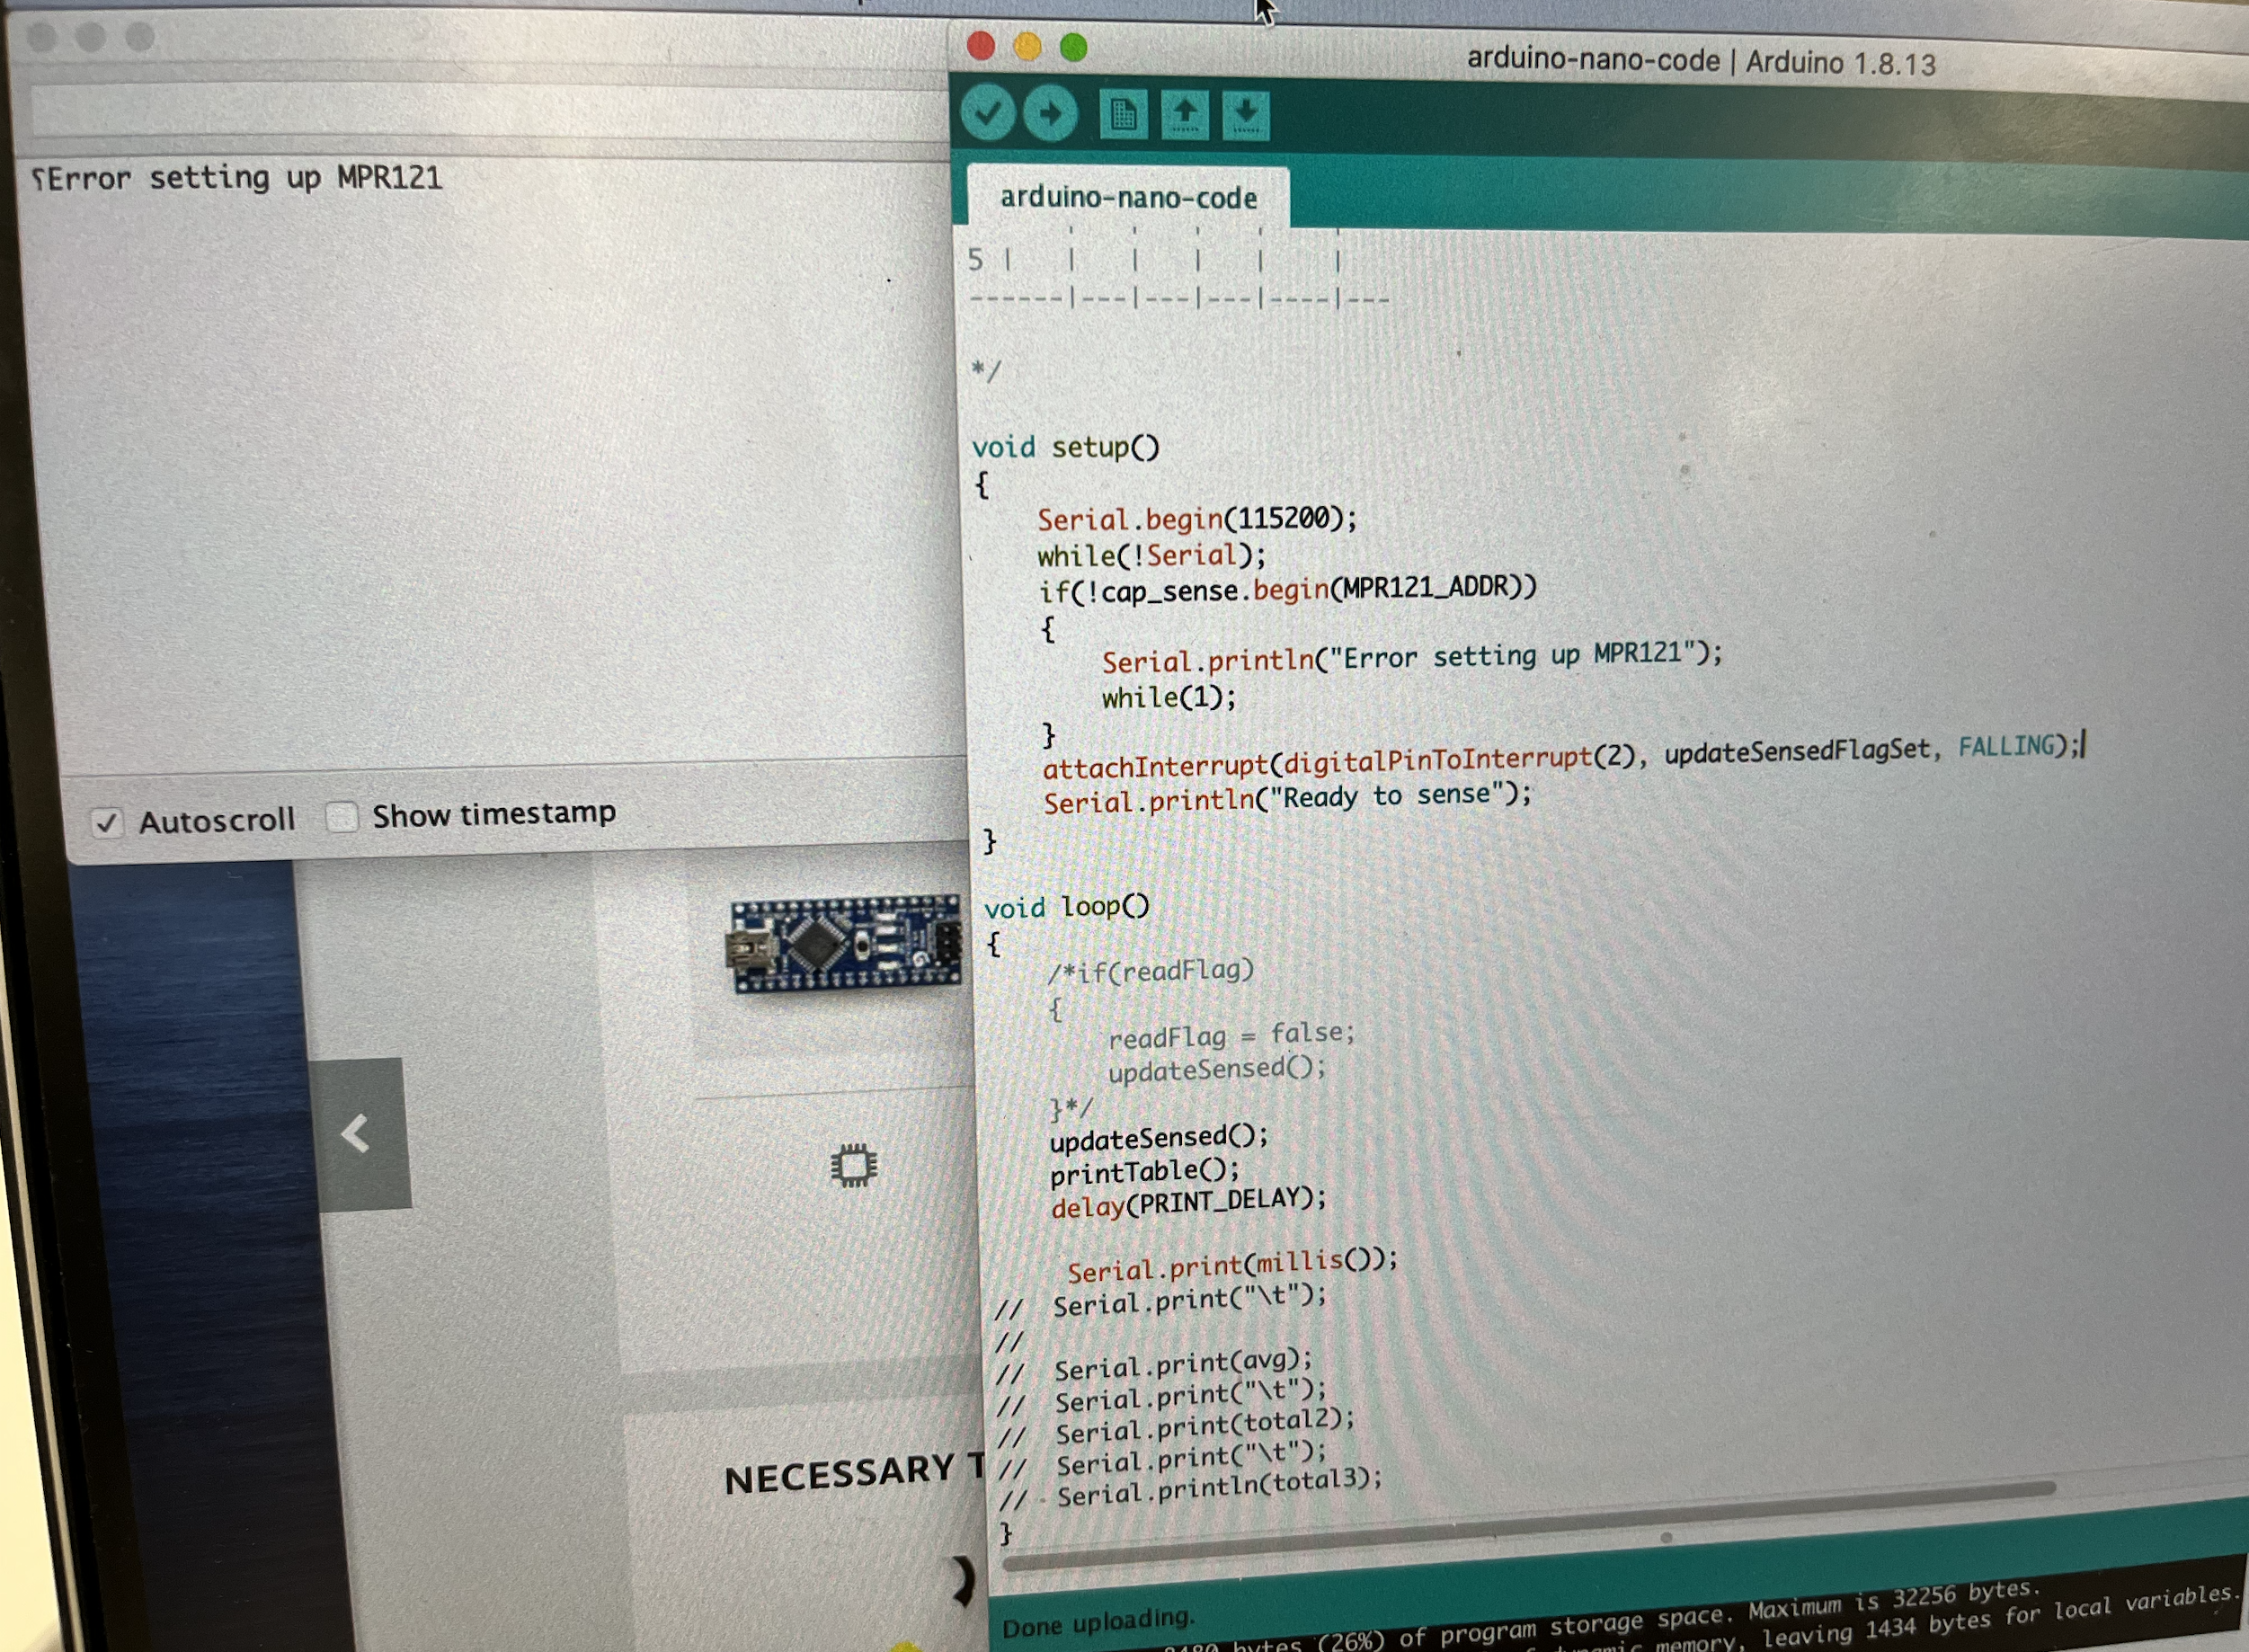
I want to make a touch board that detects where items are placed. I found this tutorial online and followed along. However, it didn't work for me. Will try this week to debug and make it work, but here's the failed attempt.
Interactive Board
Working in Progress
Error Message
1.3 CapactiveSensor - Arduino code for touch board
This is the code I used to the touch board.
            #include
              #include "Adafruit_MPR121.h"

              Adafruit_MPR121 cap_sense = Adafruit_MPR121();

              #define MPR121_ADDR 0x5A
              #define PRINT_DELAY 200

              uint32_t sensedPoints[6][6];
              volatile bool readFlag = false;

              // Rows are pin 0-5, cols are pins 6-11
              /*

              Pin 6 | 7 | 8 | 9 | 10 | 11
              0 |   |   |   |   |    |
              ------|---|---|---|----|---
              1 |   |   |   |   |    |
              ------|---|---|---|----|---
              2 |   |   |   |   |    |
              ------|---|---|---|----|---
              3 |   |   |   |   |    |
              ------|---|---|---|----|---
              4 |   |   |   |   |    |
              ------|---|---|---|----|---
              5 |   |   |   |   |    |
              ------|---|---|---|----|---

              */

              void setup()
              {
                  Serial.begin(115200);
                  while(!Serial);
                  if(!cap_sense.begin(MPR121_ADDR))
                  {
                      Serial.println("Error setting up MPR121");
                      while(1);
                  }
                  attachInterrupt(digitalPinToInterrupt(2), updateSensedFlagSet, FALLING);
                  Serial.println("Ready to sense");
              }

              void loop()
              {
                  /*if(readFlag)
                  {
                      readFlag = false;
                      updateSensed();
                  }*/
                  updateSensed();
                  printTable();
                  delay(PRINT_DELAY);

                   Serial.print(millis());
              //  Serial.print("\t");
              //
              //  Serial.print(avg);
              //  Serial.print("\t");
              //  Serial.print(total2);
              //  Serial.print("\t");
              //  Serial.println(total3);
              }

              void printTable()
              {
                  Serial.println("TABLE");
                  for(int i=0; i<6; i++)
                  {
                      for(int j=0; j<6; j++)
                      {
                          if(j != 5) Serial.print(String(sensedPoints[i][j]) + " | ");
                          else Serial.println(String(sensedPoints[i][j]));
                      }
                      //if(i == 5) Serial.println("\n-------------------\n");
                  }

              }

              void updateSensedFlagSet()
              {
                  readFlag = true;
              }

              void updateSensed()
              {
                  //Serial.println("Reading");
                  for(uint8_t i=0; i<6; i++)
                  {
                      for(uint8_t j=0; j<6; j++) sensedPoints[i][j] = cap_sense.filteredData(i) * cap_sense.filteredData(j + 6);
                  }
                  //Serial.println("Table updated");
              }
II. Flex Sensor
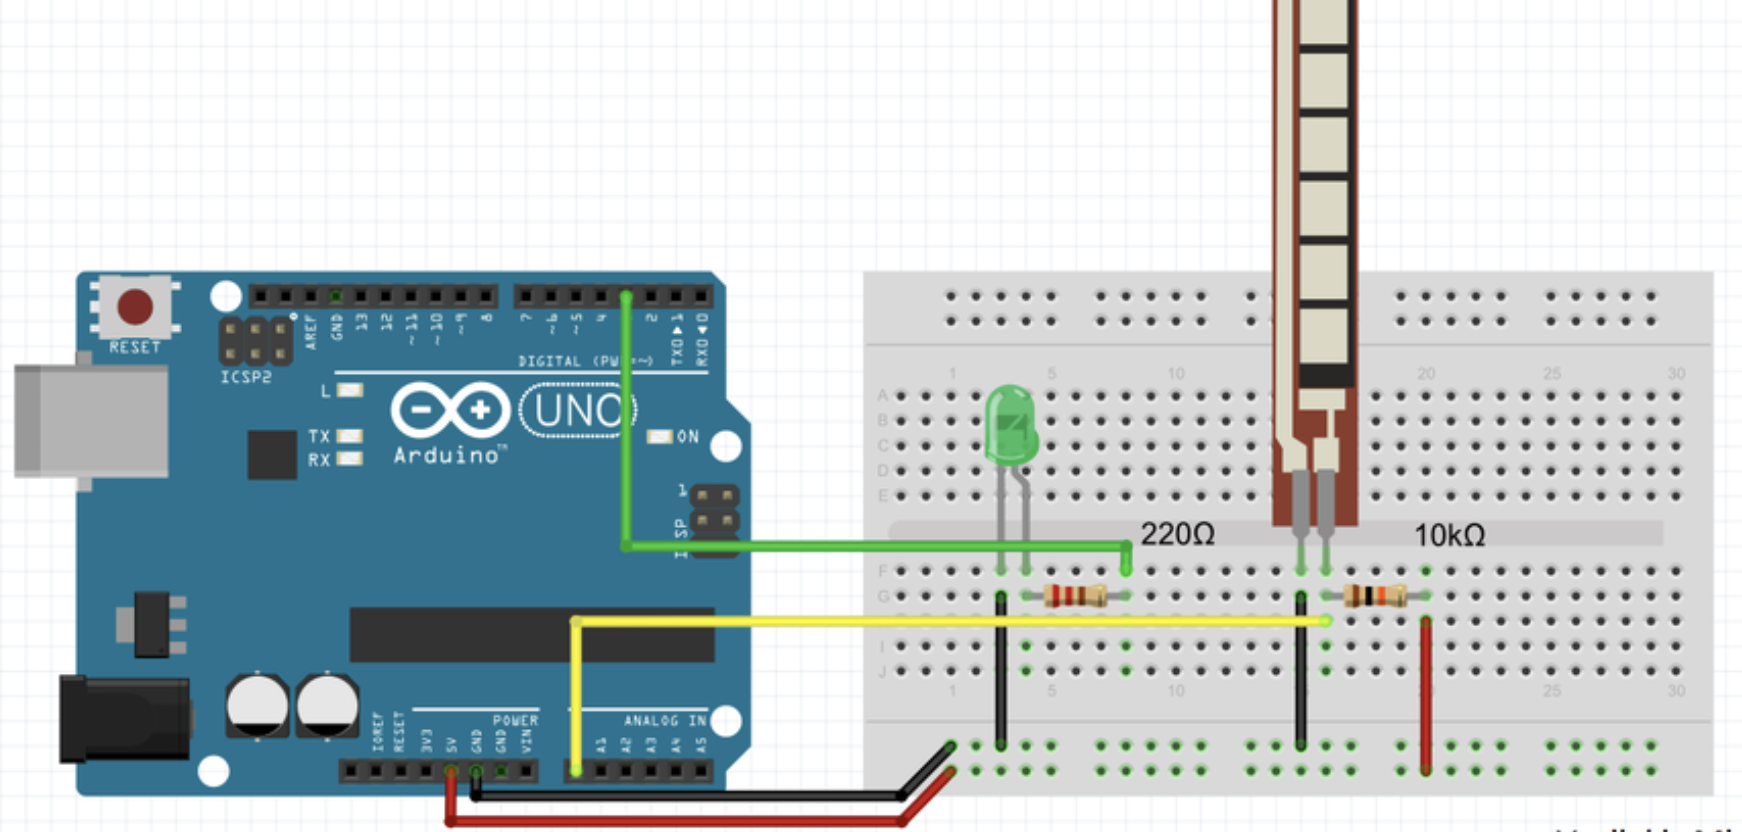
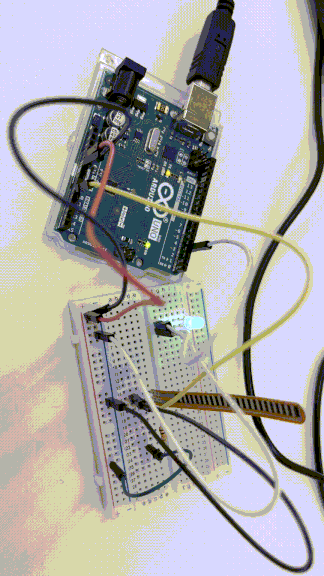
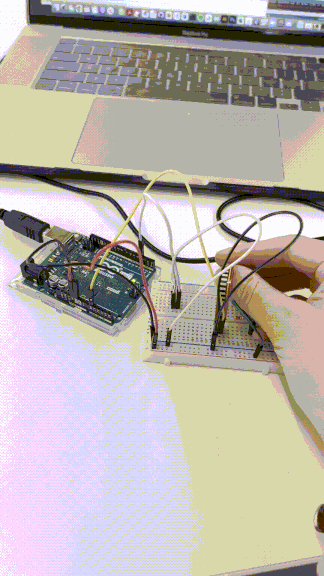
This is how I wire the flex sensor. It seems flex sensor to be very easy to implement.
Flex Sensor Wire
View 2
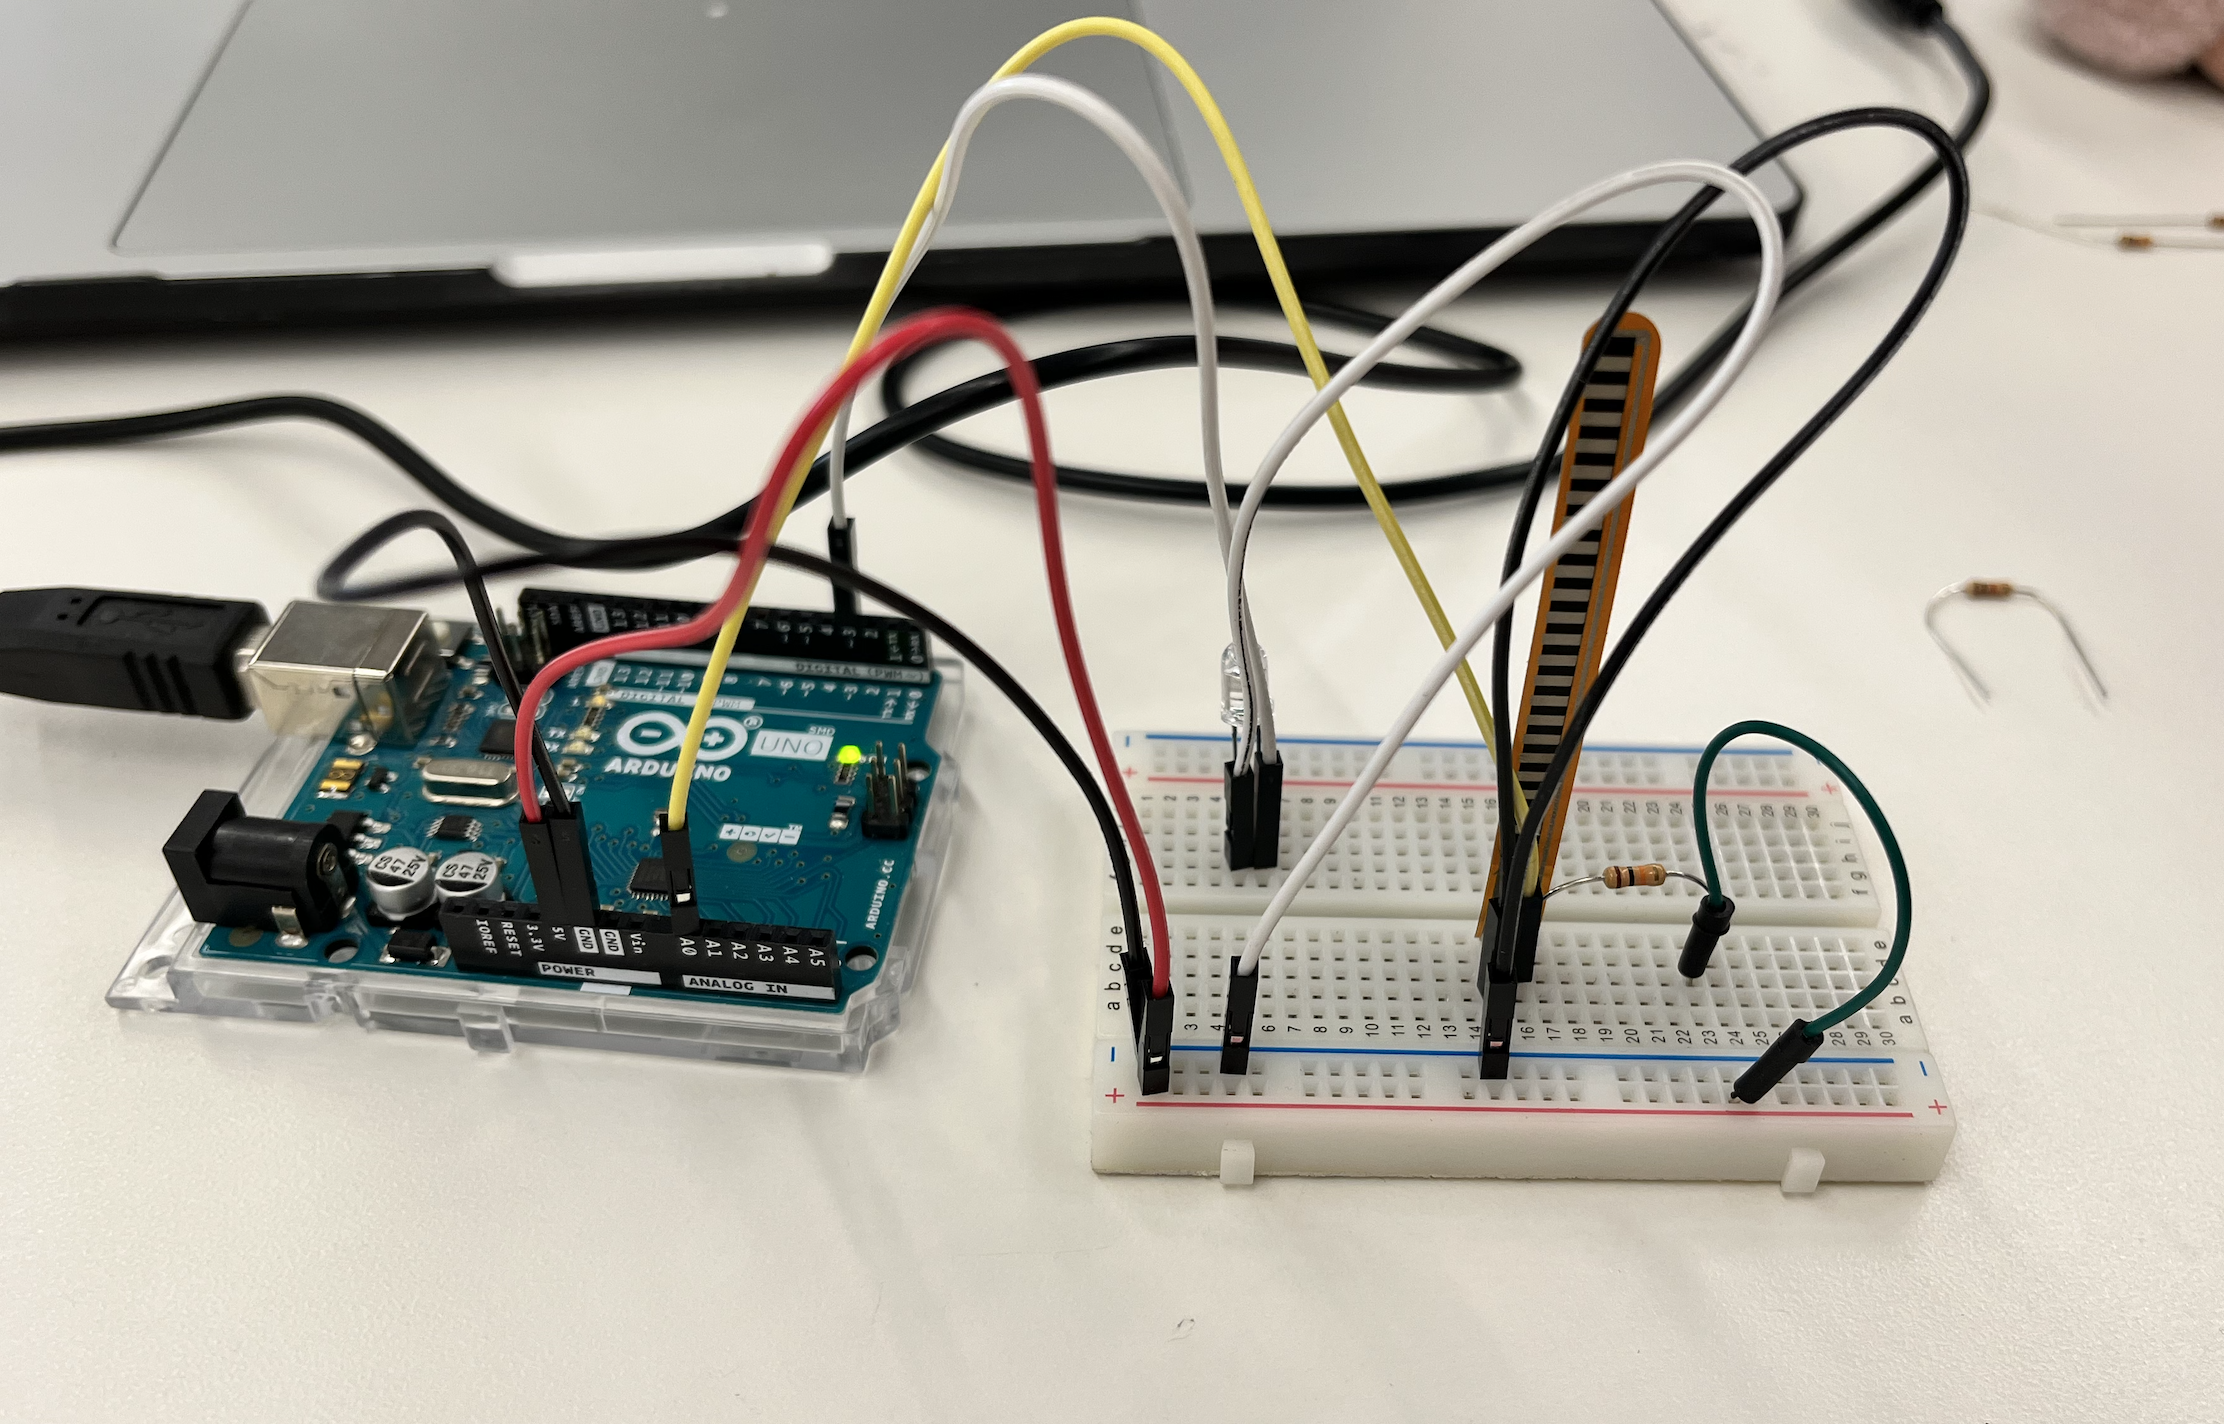
Then I used series monitor to track its changes and see the number range. I also connected flex sensor with a LED light to see how it changes its brightness.
Flex Sensor with LED lights
Flex Sensor series monitor
Arduino code for flex sensor
This is the code I used to flex sensor.
            /* How to use a flex sensor/resistro - Arduino Tutorial
   Fade an LED with a flex sensor
   More info: http://www.ardumotive.com/how-to-use-a-flex-sensor-en.html
   Dev: Michalis Vasilakis // Date: 9/7/2015 // www.ardumotive.com  */


//Constants:
const int ledPin = 3;   //pin 3 has PWM funtion
const int flexPin = A0; //pin A0 to read analog input

//Variables:
int value; //save analog value


void setup(){

  pinMode(ledPin, OUTPUT);  //Set pin 3 as 'output'
  Serial.begin(9600);       //Begin serial communication

}

void loop(){

  value = analogRead(flexPin);         //Read and save analog value from potentiometer
  Serial.println(value);               //Print value
  value = map(value, 700, 900, 0, 255);//Map value 0-1023 to 0-255 (PWM)
  analogWrite(ledPin, value);          //Send PWM value to led
  delay(100);                          //Small delay

}
III. Ultrasonic Sensor + Piezo Buzzer
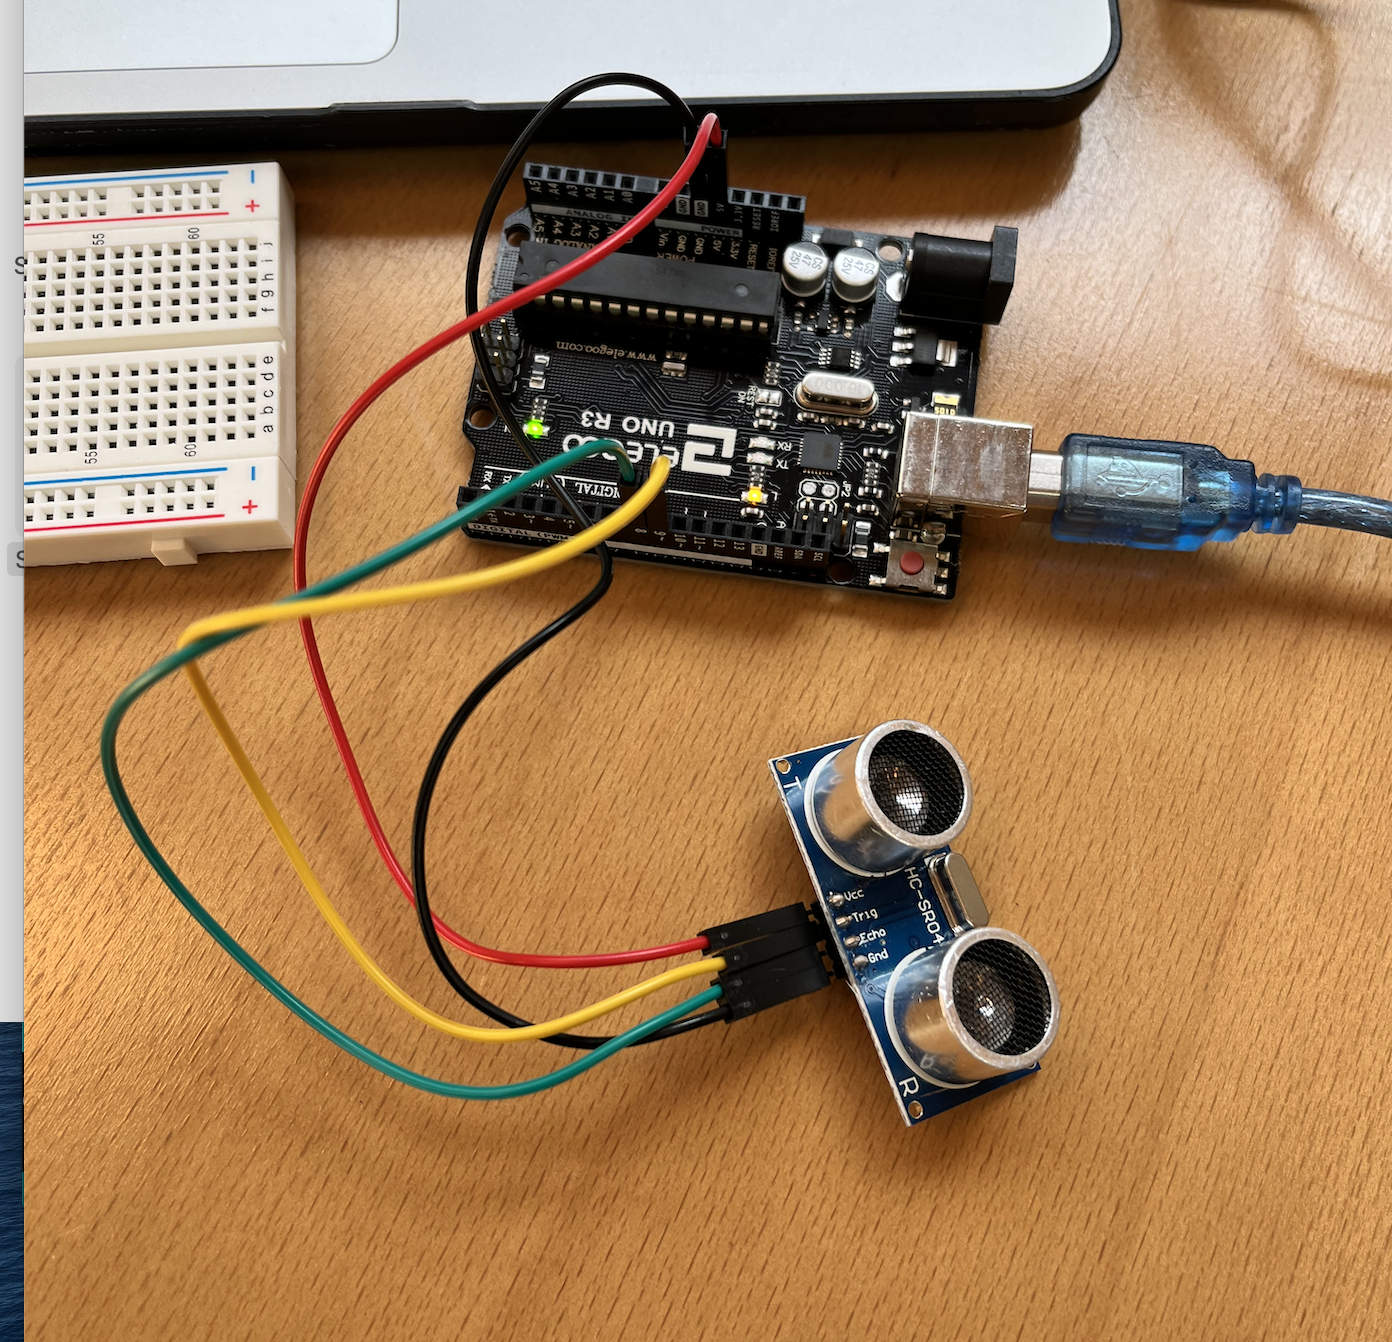
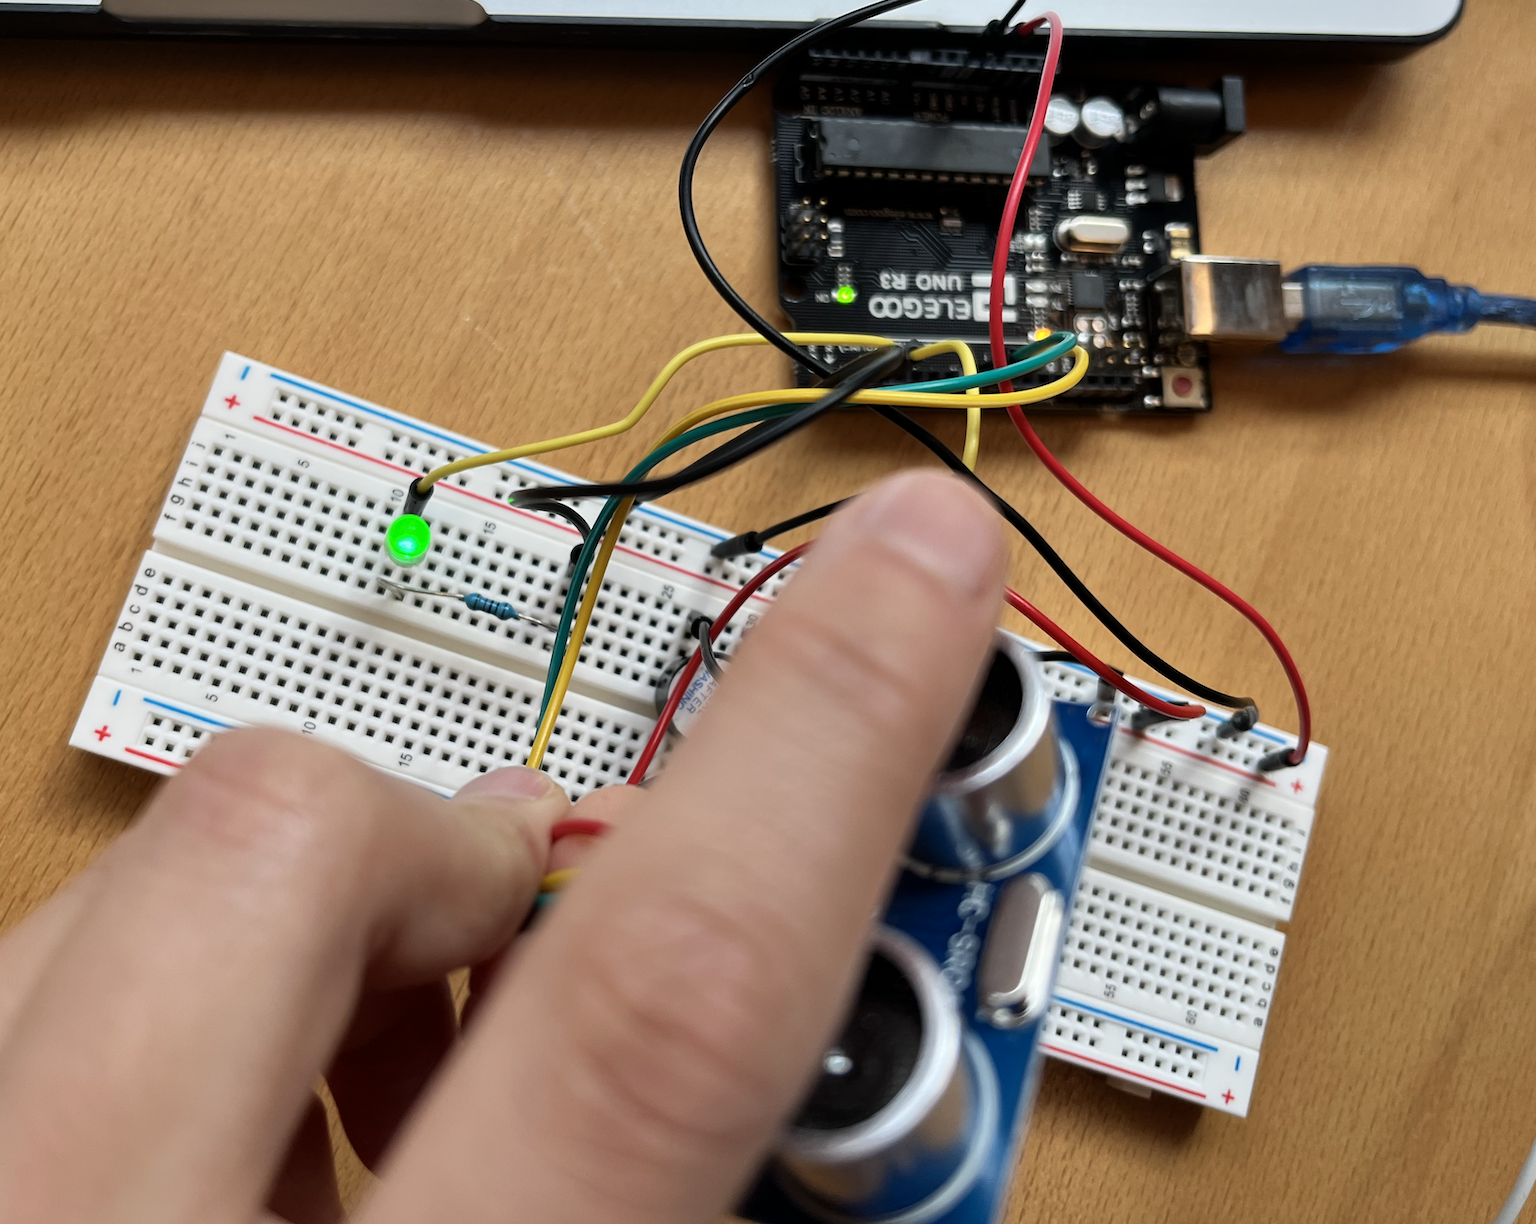
Another thing I tried is to use ultrasonic sensor. This ultrasonic sensor HC-SR04 is to measure the distance to an object by using ultrasonic waves. VCC pin is to connect with voltage, 5V. GND pin is to connect to the ground, 0V. TRIG pin is to receive the control signal (pulse) from Arduino. ECHO pin is to send a signal (pulse) to Arduino. Arduino measures the duration of pulse to calculate distance.
Ultrasonic Sensor Wire
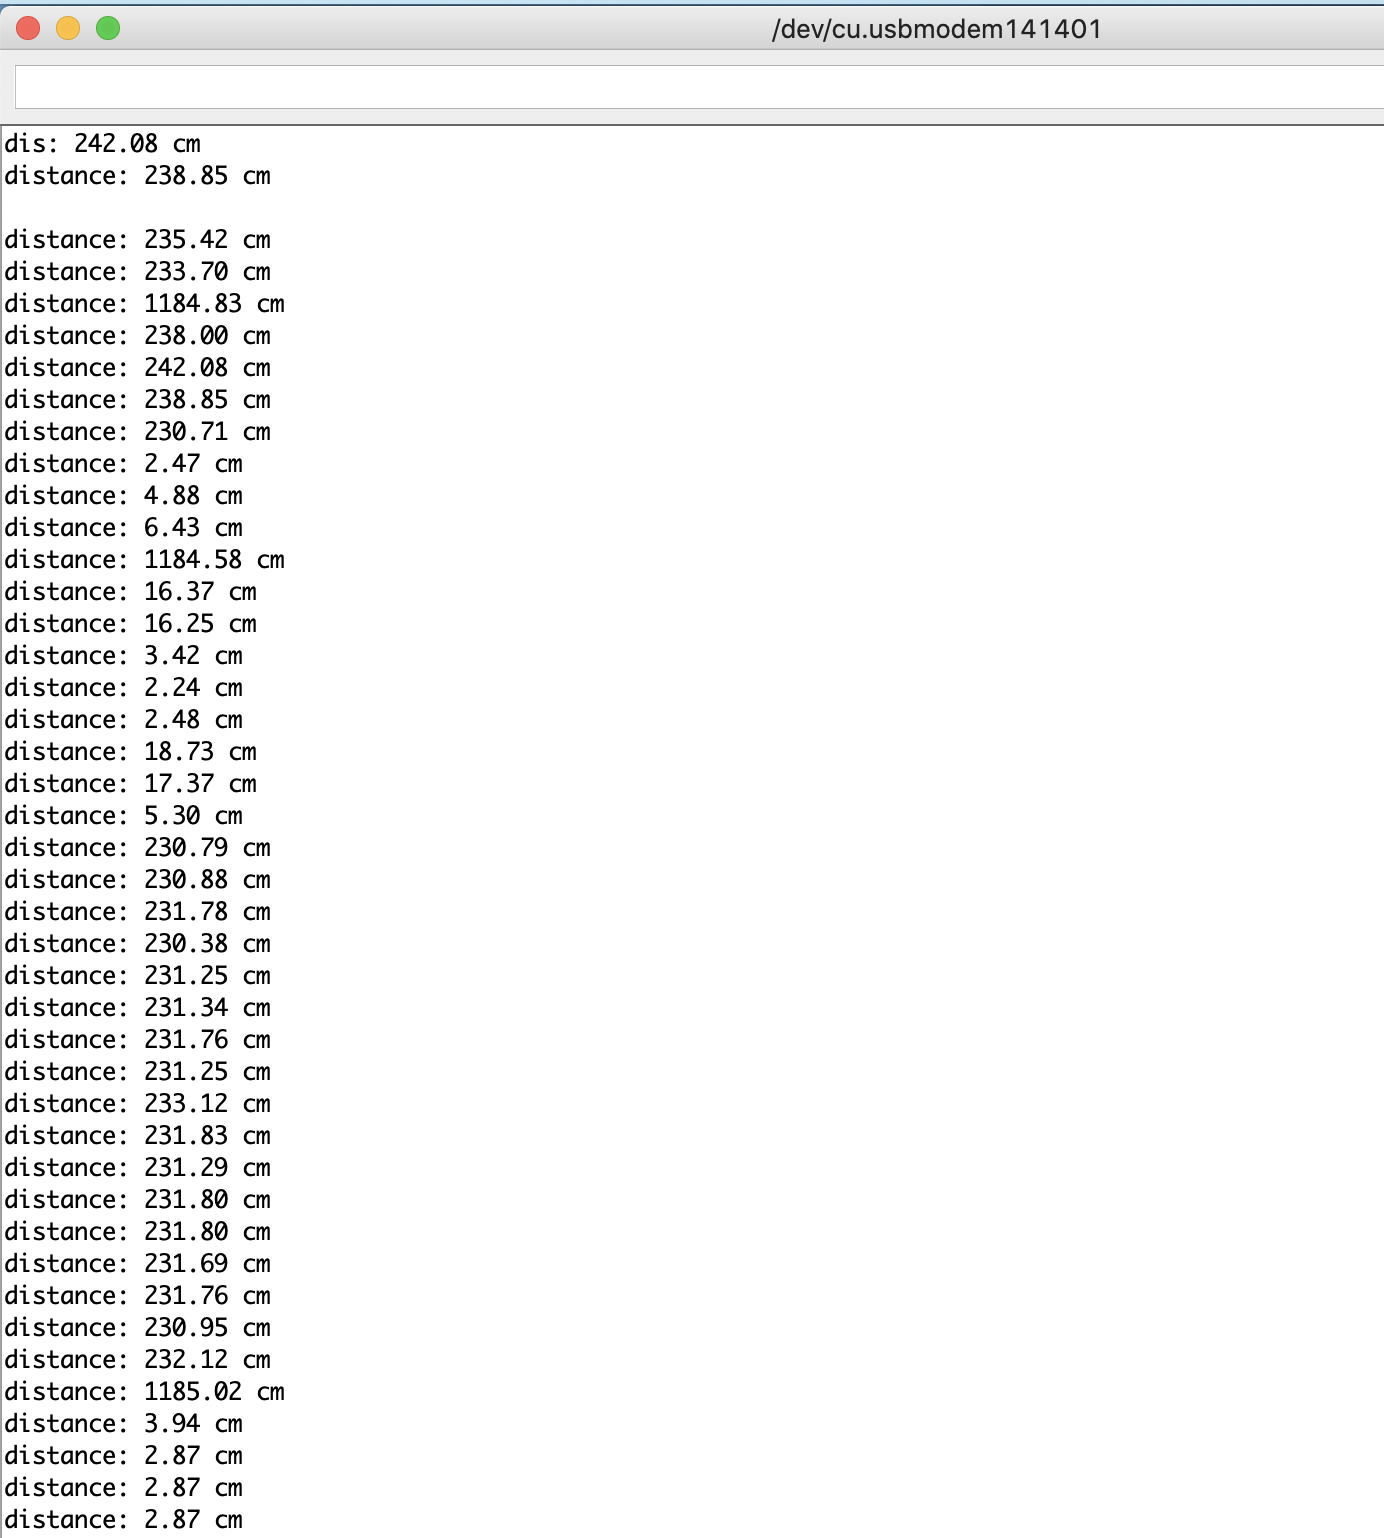
Ultrasonic Sensor series monitor
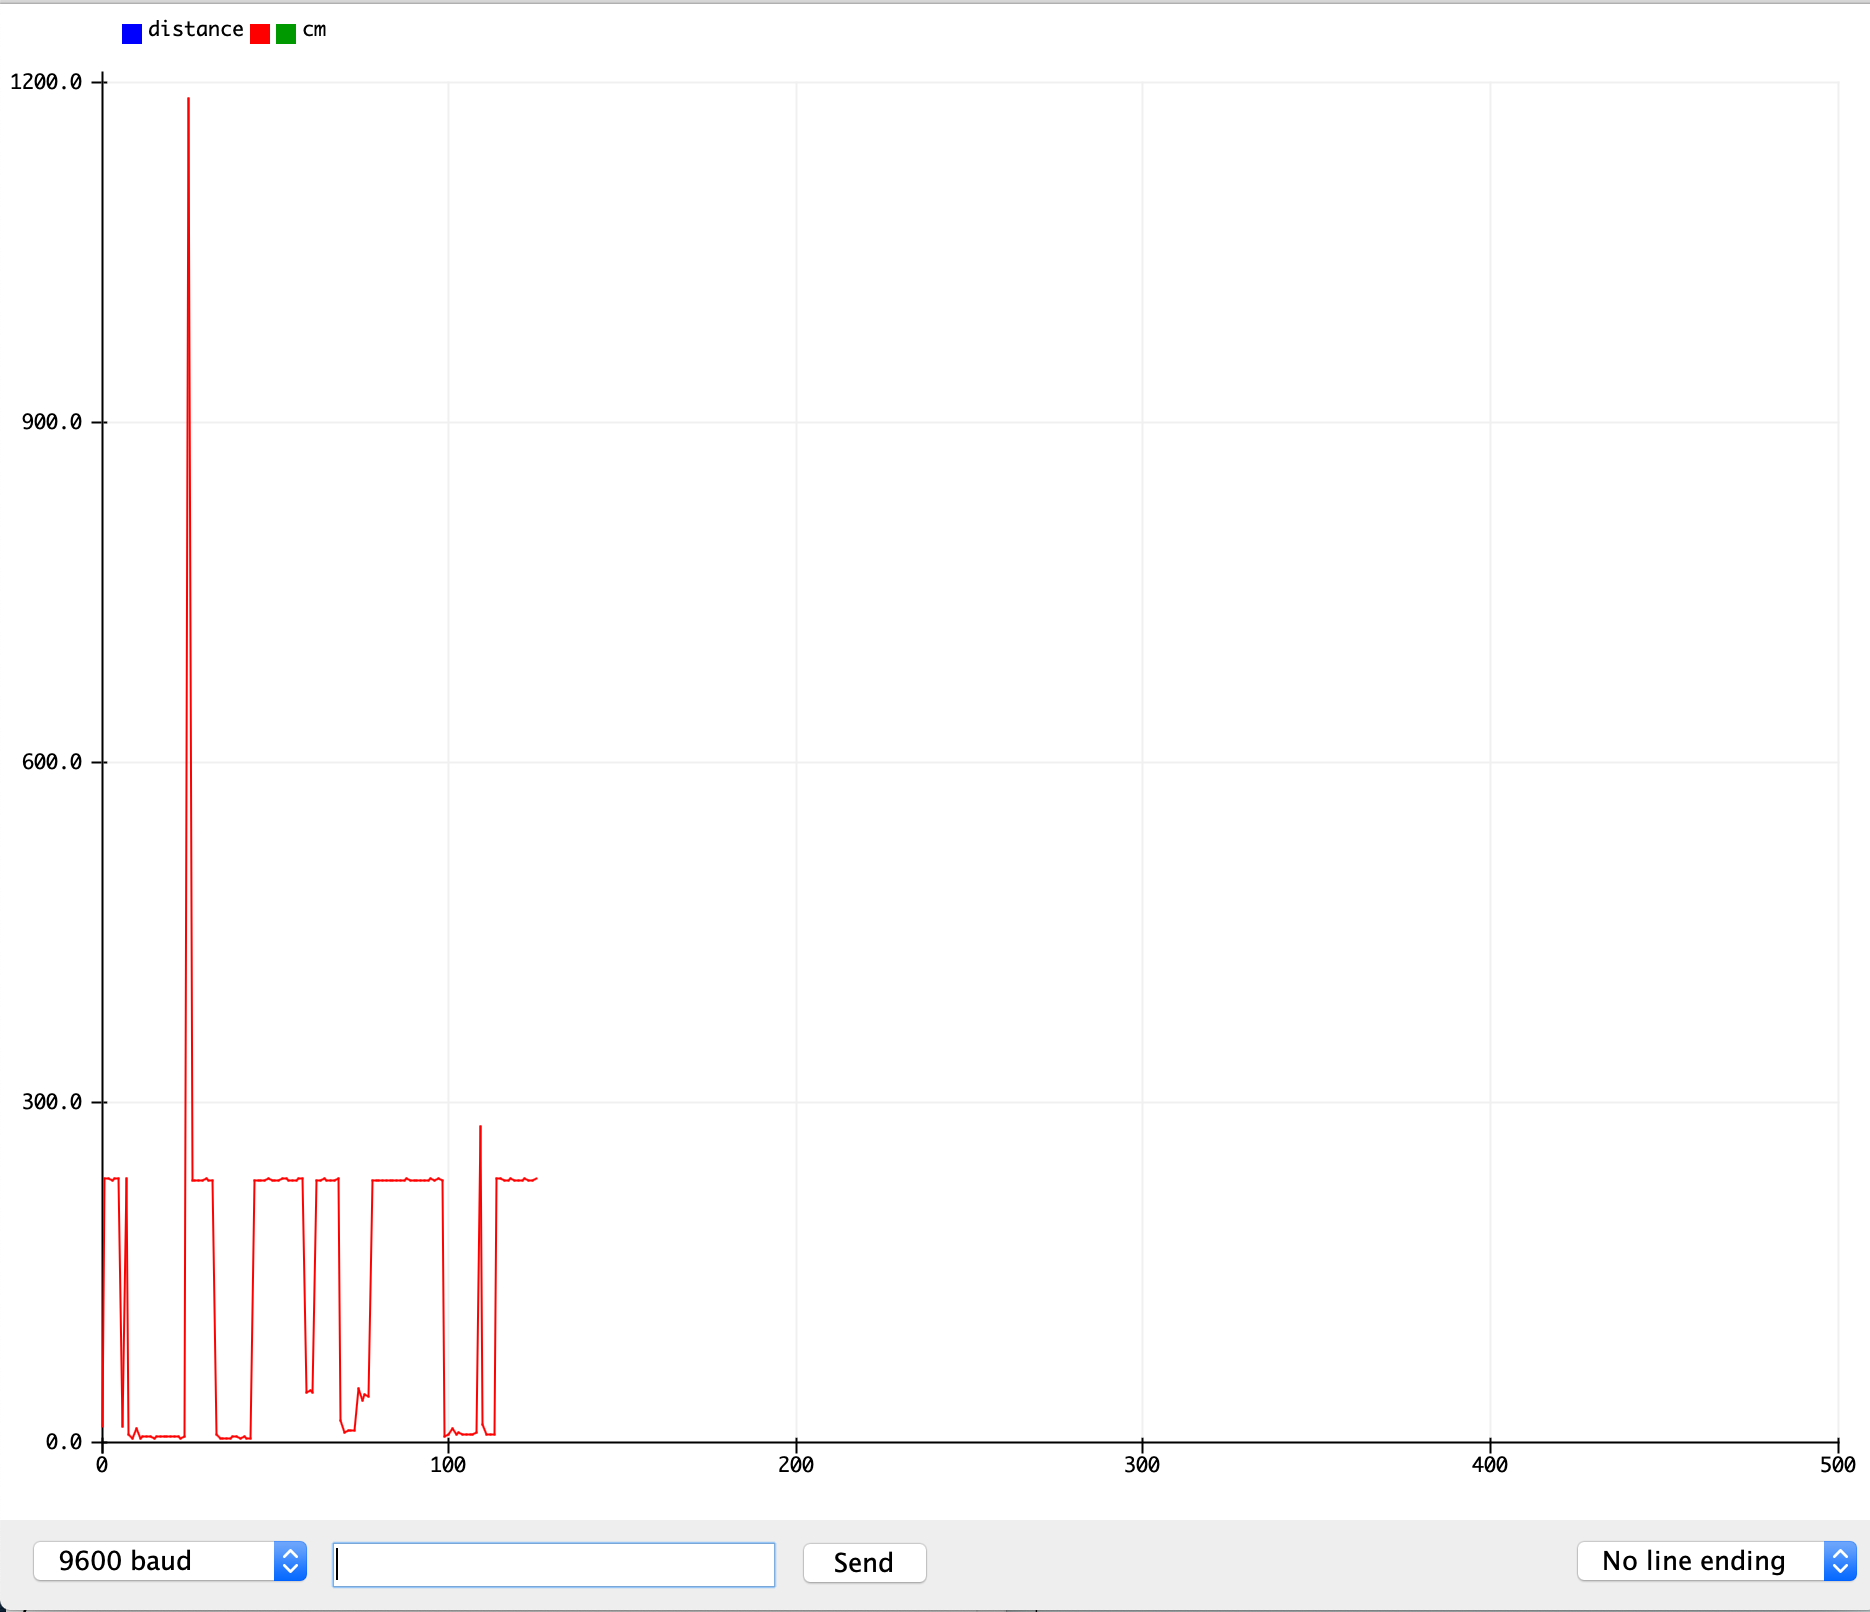
Ultrasonic Sensor series plotter
3.1 Arduino Ultrasonic sensor code
            /*
 * Created by ArduinoGetStarted, https://arduinogetstarted.com
 *
 * Arduino - Ultrasonic Sensor HC-SR04
 *
 * Wiring: Ultrasonic Sensor -> Arduino:
 * - VCC  -> 5VDC
 * - TRIG -> Pin 9
 * - ECHO -> Pin 8
 * - GND  -> GND
 *
 * Tutorial is available here: https://arduinogetstarted.com/tutorials/arduino-ultrasonic-sensor
 */

int trigPin = 9;    // TRIG pin
int echoPin = 8;    // ECHO pin

float duration_us, distance_cm;

void setup() {
  // begin serial port
  Serial.begin (9600);

  // configure the trigger pin to output mode
  pinMode(trigPin, OUTPUT);
  // configure the echo pin to input mode
  pinMode(echoPin, INPUT);
}

void loop() {
  // generate 10-microsecond pulse to TRIG pin
  digitalWrite(trigPin, HIGH);
  delayMicroseconds(10);
  digitalWrite(trigPin, LOW);

  // measure duration of pulse from ECHO pin
  duration_us = pulseIn(echoPin, HIGH);

  // calculate the distance
  distance_cm = 0.017 * duration_us;

  // print the value to Serial Monitor
  Serial.print("distance: ");
  Serial.print(distance_cm);
  Serial.println(" cm");

  delay(500);
}
3.2 Ultrasonic sensor with Piezo Buzzer and LED
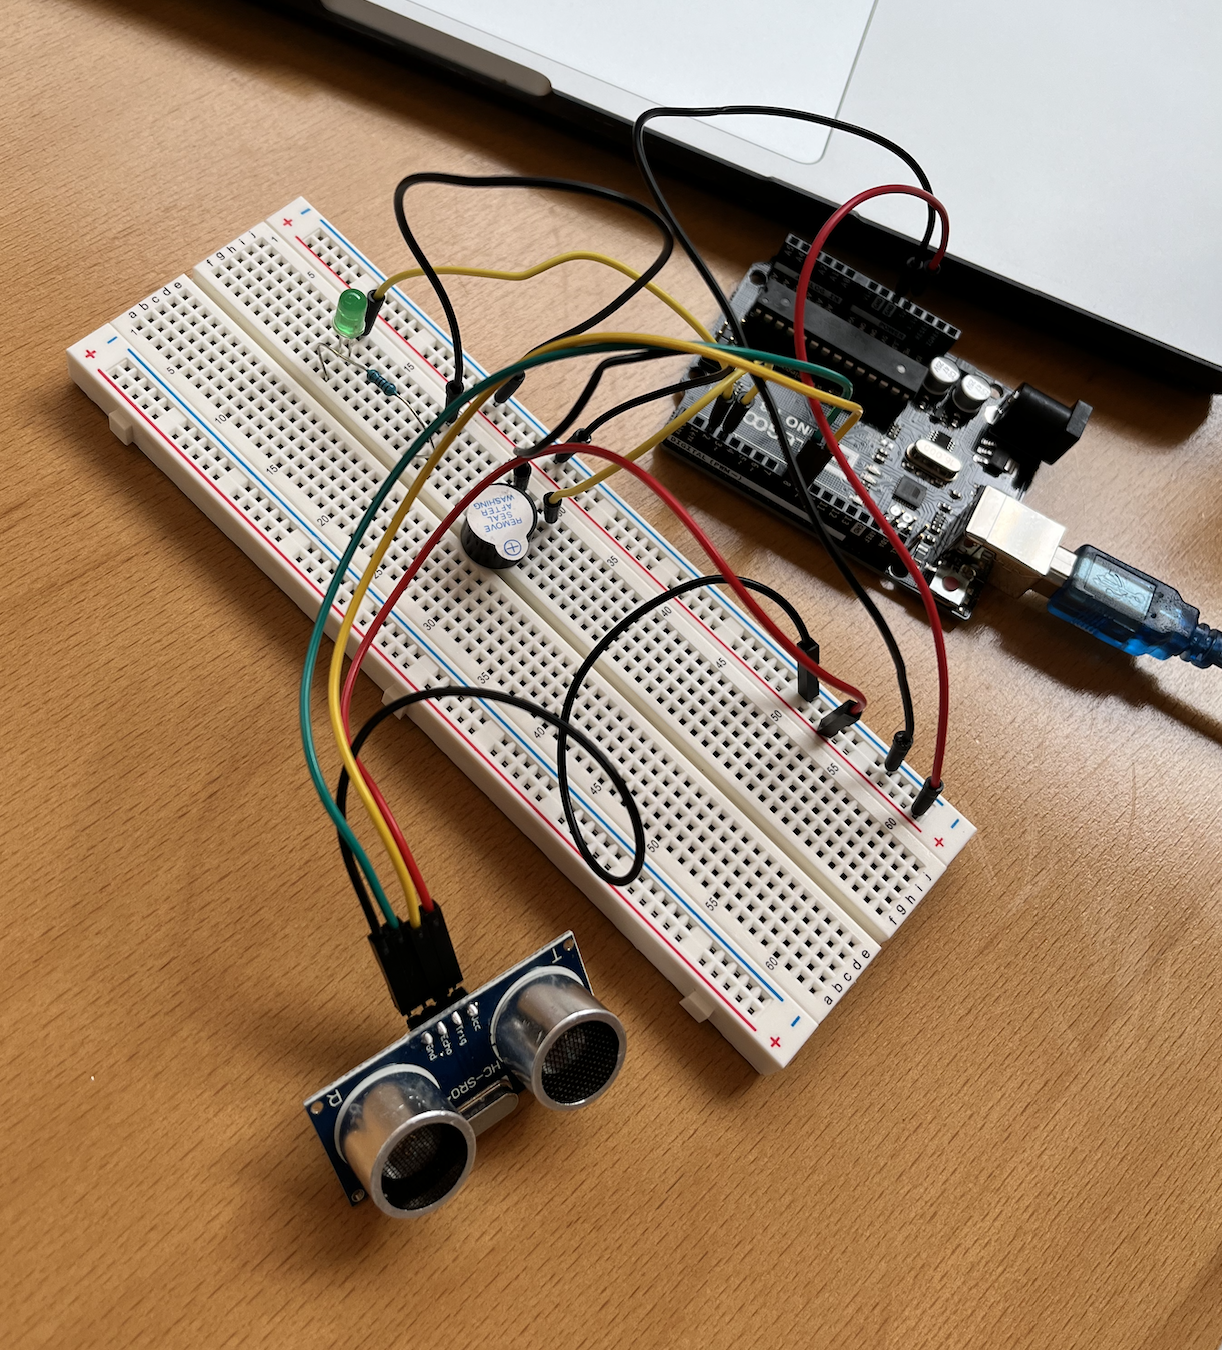
Then I want to go beyond the simple tutorial online. I wired ultrasonic sensor with Piezo Buzzer to play a jungle bells song and also make the LED light up.
Ultrasonic Sensor Wire
Ultrasonic Sensor series monitor
3.2 Arduino Ultrasonic sensor code
            /*
 * Created by ArduinoGetStarted.com
 *
 * This example code is in the public domain
 *
 * Tutorial page: https://arduinogetstarted.com/tutorials/arduino-ultrasonic-sensor-piezo-buzzer
 */

#include "pitches.h"

// constants won't change
const int TRIG_PIN   = 6; // Arduino pin connected to Ultrasonic Sensor's TRIG pin
const int ECHO_PIN   = 7; // Arduino pin connected to Ultrasonic Sensor's ECHO pin
const int BUZZER_PIN = 3; // Arduino pin connected to Piezo Buzzer's pin
const int DISTANCE_THRESHOLD = 50; // centimeters
const int LED_PIN  = 2; // Arduino pin connected to LED's pin

// variables will change:
float duration_us, distance_cm;

// notes in the melody:
int melody[] = {
  NOTE_E5, NOTE_E5, NOTE_E5,
  NOTE_E5, NOTE_E5, NOTE_E5,
  NOTE_E5, NOTE_G5, NOTE_C5, NOTE_D5,
  NOTE_E5,
  NOTE_F5, NOTE_F5, NOTE_F5, NOTE_F5,
  NOTE_F5, NOTE_E5, NOTE_E5, NOTE_E5, NOTE_E5,
  NOTE_E5, NOTE_D5, NOTE_D5, NOTE_E5,
  NOTE_D5, NOTE_G5
};

// note durations: 4 = quarter note, 8 = eighth note, etc, also called tempo:
int noteDurations[] = {
  8, 8, 4,
  8, 8, 4,
  8, 8, 8, 8,
  2,
  8, 8, 8, 8,
  8, 8, 8, 16, 16,
  8, 8, 8, 8,
  4, 4
};

void setup() {
  Serial.begin (9600);       // initialize serial port
  pinMode(TRIG_PIN, OUTPUT);   // set arduino pin to output mode
  pinMode(ECHO_PIN, INPUT);    // set arduino pin to input mode
  pinMode(LED_PIN, OUTPUT);  // set arduino pin to output mode
}

void loop() {
  // generate 10-microsecond pulse to TRIG pin
  digitalWrite(TRIG_PIN, HIGH);
  delayMicroseconds(10);
  digitalWrite(TRIG_PIN, LOW);

  // measure duration of pulse from ECHO pin
  duration_us = pulseIn(ECHO_PIN, HIGH);
  // calculate the distance
  distance_cm = 0.017 * duration_us;


  if(distance_cm < DISTANCE_THRESHOLD)
    digitalWrite(LED_PIN, HIGH); // turn on LED
  else
    digitalWrite(LED_PIN, LOW);  // turn off LED

  // print the value to Serial Monitor
  Serial.print("distance: ");
  Serial.print(distance_cm);
  Serial.println(" cm");

  //  if(distance_cm < DISTANCE_THRESHOLD)
//    buzzer(); // play a song

  delay(500);


//  delay(500);
}

void buzzer() {
  // iterate over the notes of the melody:
  int size = sizeof(noteDurations) / sizeof(int);

  for (int thisNote = 0; thisNote < size; thisNote++) {
    // to calculate the note duration, take one second divided by the note type.
    //e.g. quarter note = 1000 / 4, eighth note = 1000/8, etc.
    int noteDuration = 1000 / noteDurations[thisNote];
    tone(BUZZER_PIN, melody[thisNote], noteDuration);

    // to distinguish the notes, set a minimum time between them.
    // the note's duration + 30% seems to work well:
    int pauseBetweenNotes = noteDuration * 1.30;
    delay(pauseBetweenNotes);
    // stop the tone playing:
    noTone(BUZZER_PIN);
  }
}
IV. Arduino Paper controller
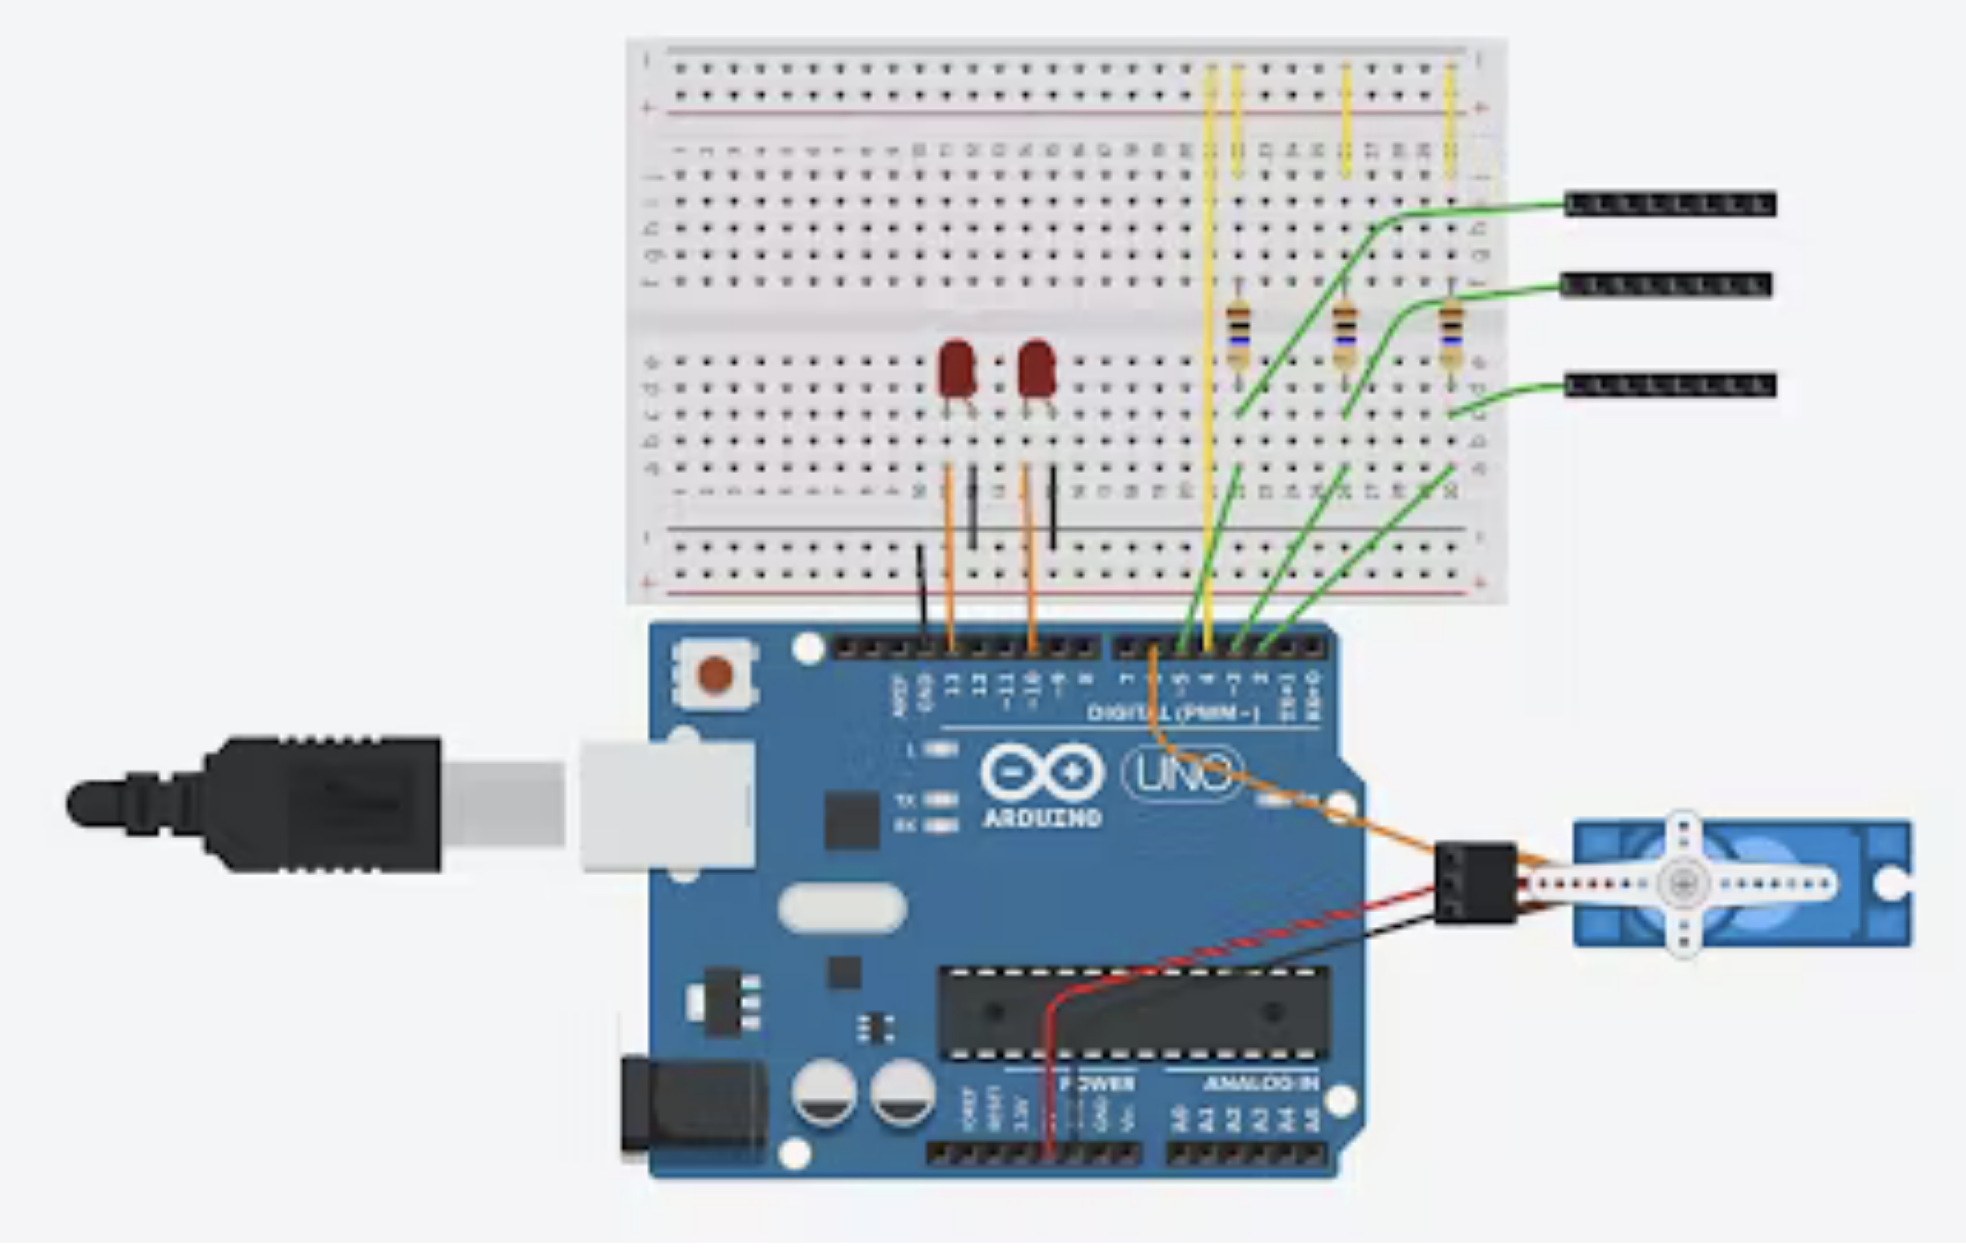
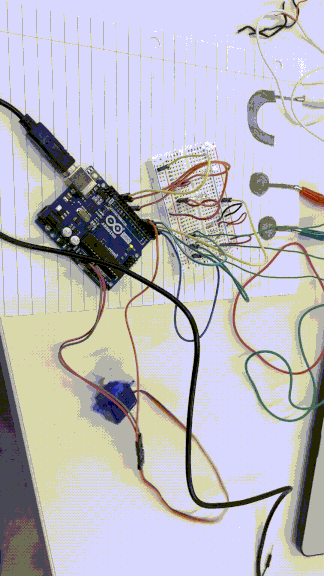
Then I also found this tutorial online. A very simple paperbased controller. I'm fascinated by the simplicity and recreated this paper based controller.
Paper-based controller wire

Paper-based controller wire diagram
Effect gif
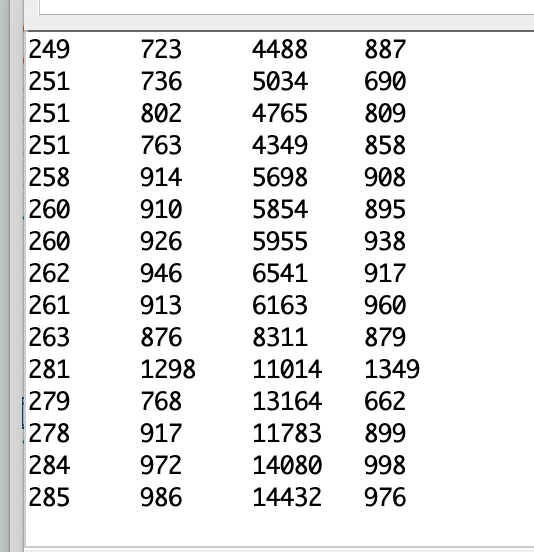
Series Monitor
Arduino code for paper-based wire
            #include
              #include

              Servo myservo;

              CapacitiveSensor   button1 = CapacitiveSensor(4, 2);
              CapacitiveSensor   button2 = CapacitiveSensor(4, 3);
              CapacitiveSensor   slider = CapacitiveSensor(4, 5);

              int total1val = 1000;//you'll need to edit these
              int total2val = 1000;
              int total3val1 = 100;
              int total3val2 = 1000;


              void setup() {
                //button1.set_CS_AutocaL_Millis(0xFFFFFFFF);
                Serial.begin(9600);
                pinMode(10, OUTPUT);
                pinMode(13, OUTPUT);
                myservo.attach(6);
              }

              void loop() {
                long start = millis();
                long total1 =  button1.capacitiveSensor(1000);
                long total2 =  button2.capacitiveSensor(1000);
                long total = 0;
                long total3 = 0;

                for (int i = 1; i <= 10; i++) {//averages the value for the slide to make the servo smoother
                  total3 =  slider.capacitiveSensor(10000);
                  total = total + total3;
                  delay(1);
                }

                long avg = total / 10;
                int angle;

                Serial.print(millis() - start);
                Serial.print("\t");

                Serial.print(avg);
                Serial.print("\t");
                Serial.print(total2);
                Serial.print("\t");
                Serial.println(total3);

                if (total1 > total1val) {
                  digitalWrite(13, HIGH);
                }
                else {
                  digitalWrite(13, LOW);
                }

                if (total2 > total2val) {
                  digitalWrite(10, HIGH);
                }
                else {
                  digitalWrite(10, LOW);
                }

                angle = map(avg, total3val1, total3val2, 180, 0);
                myservo.write(angle);

                delay(10);
              }