
For this week, I collaborated with Mimi to work on the interaction between two different devices.
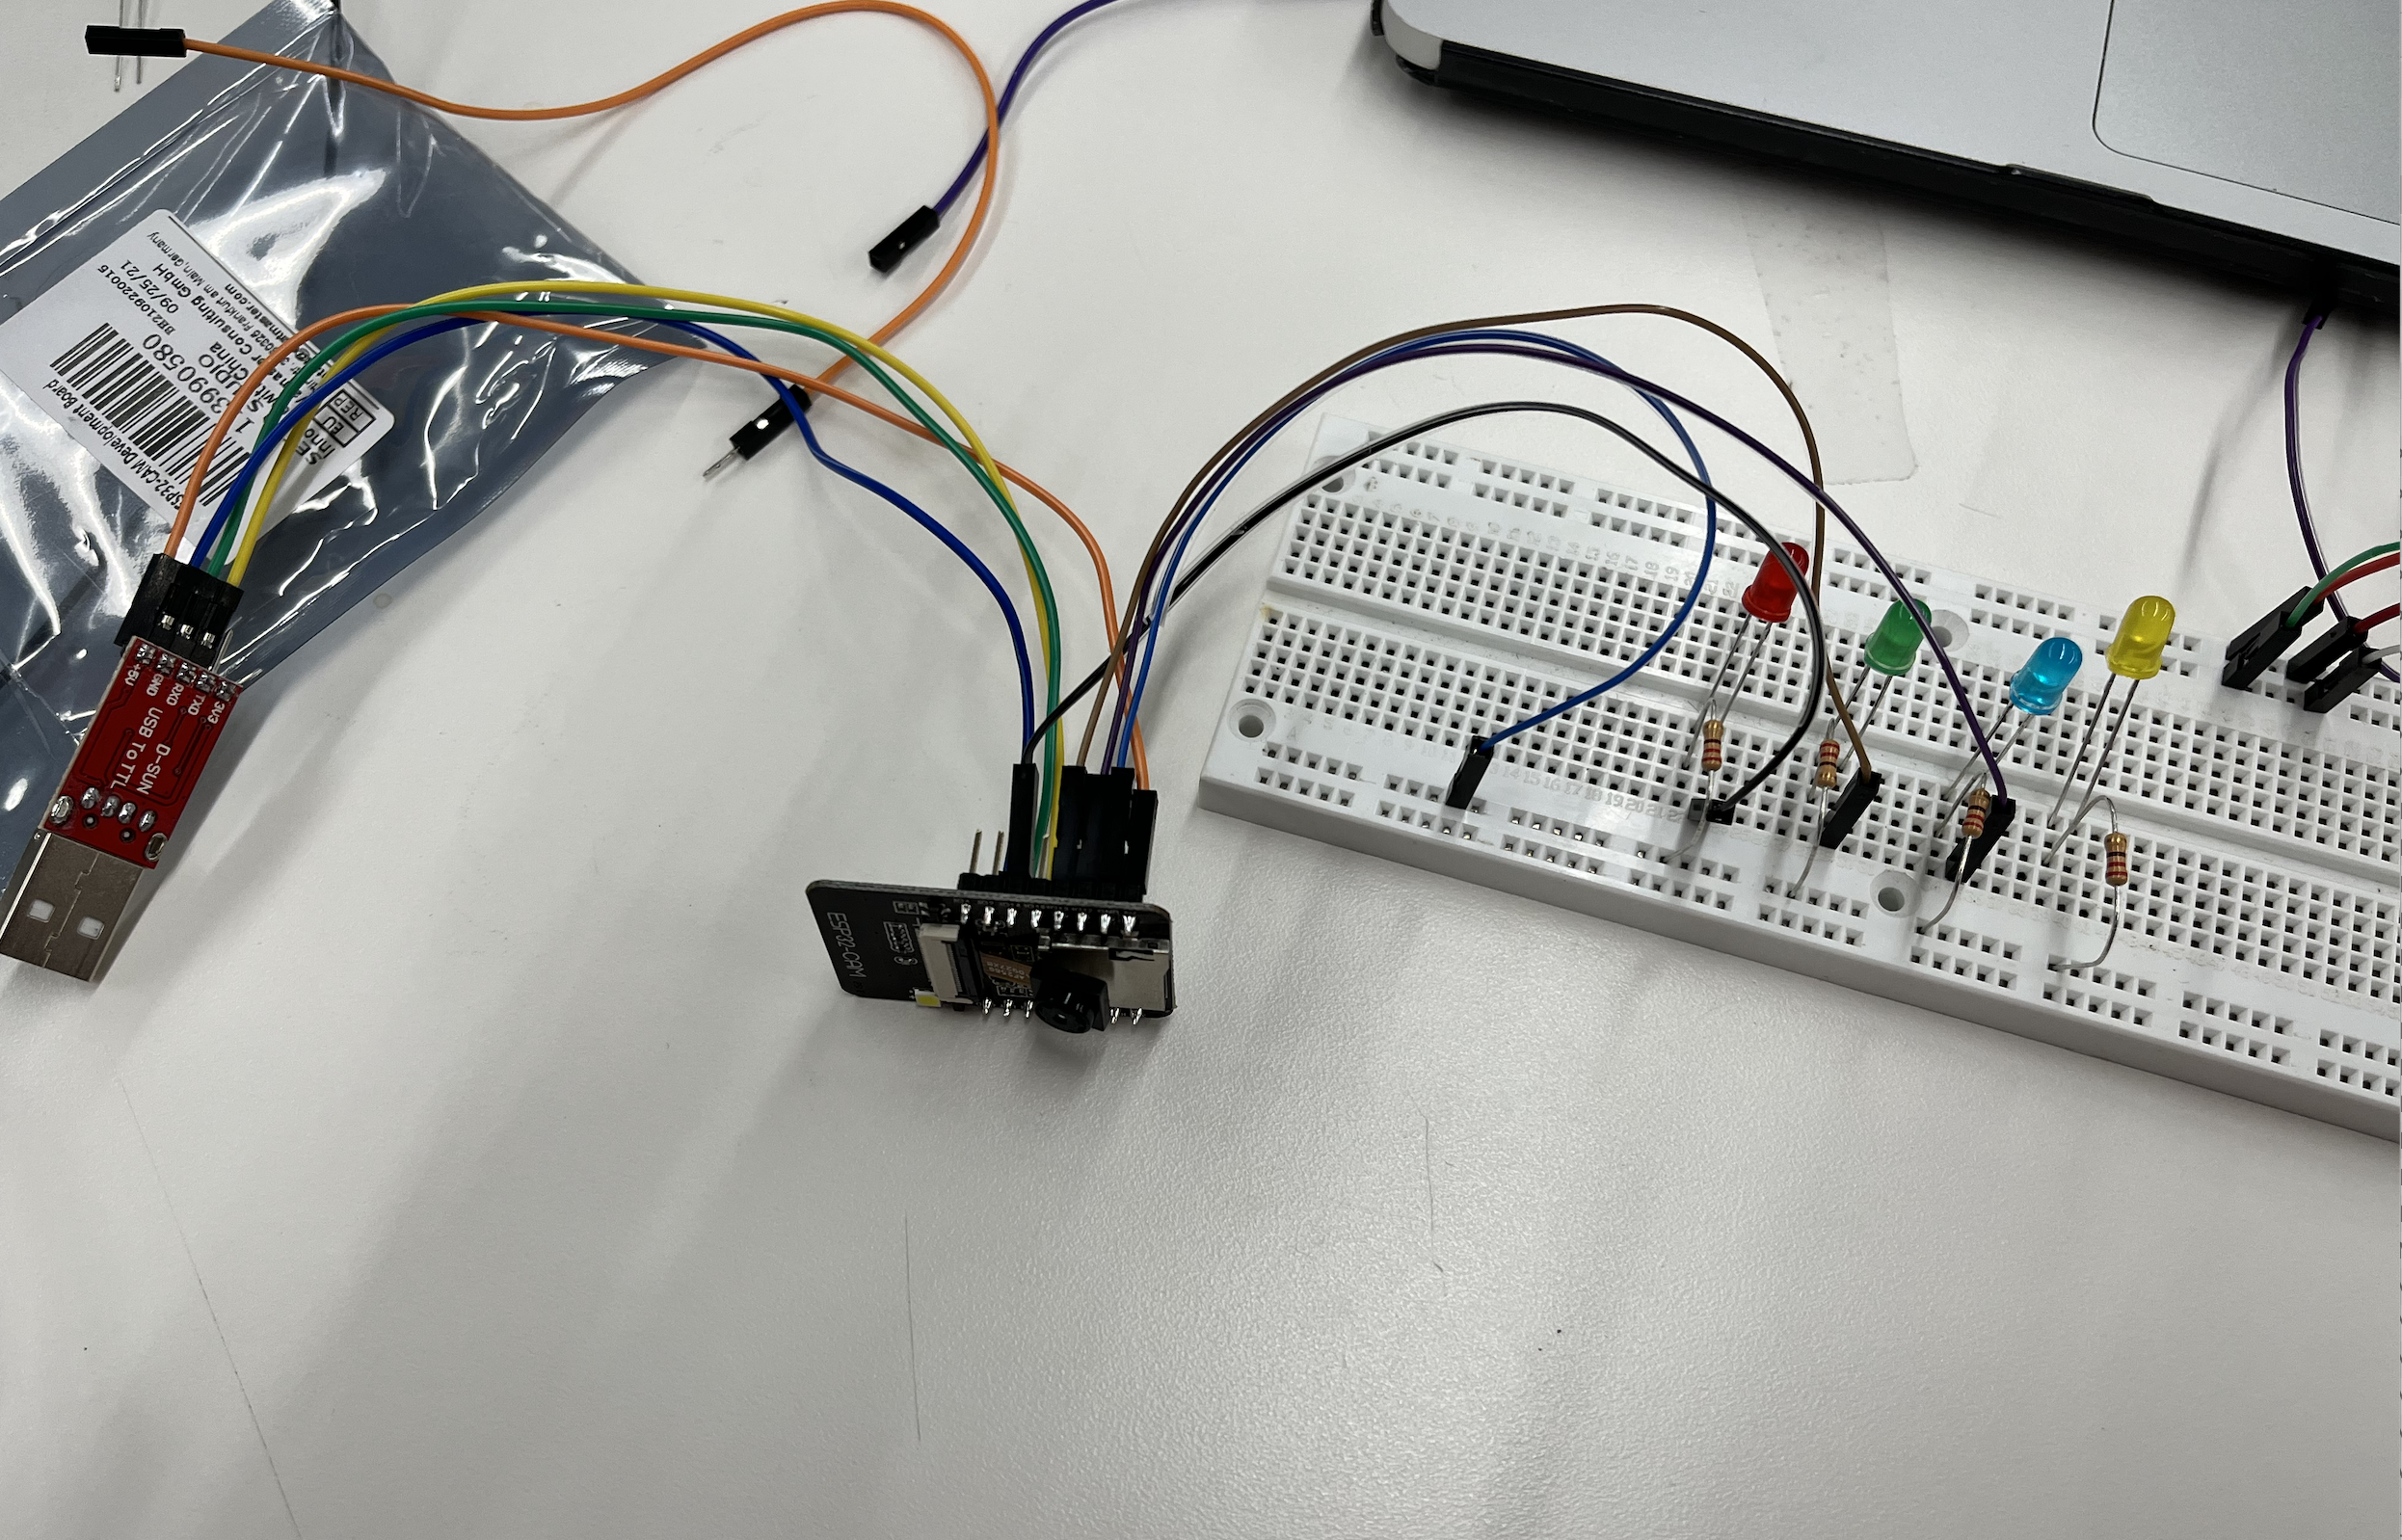
I had a lot of troubles when working with ESP 32 CAM. It took me a while to figure out why I can't even write to ESP32 CAM (I need to connect the ground to GPIO) Here are two learnings.
- first when uploading - GPIO 0 must be connected to GND to upload a sketch
- uploading and get the IP address disconnect GPIO 0 to GND then trying to find IP address...
- After connecting GPIO 0 to GND, press the ESP32-CAM on-board RESET button to put your board in flashing mode
can't upload Arduino code
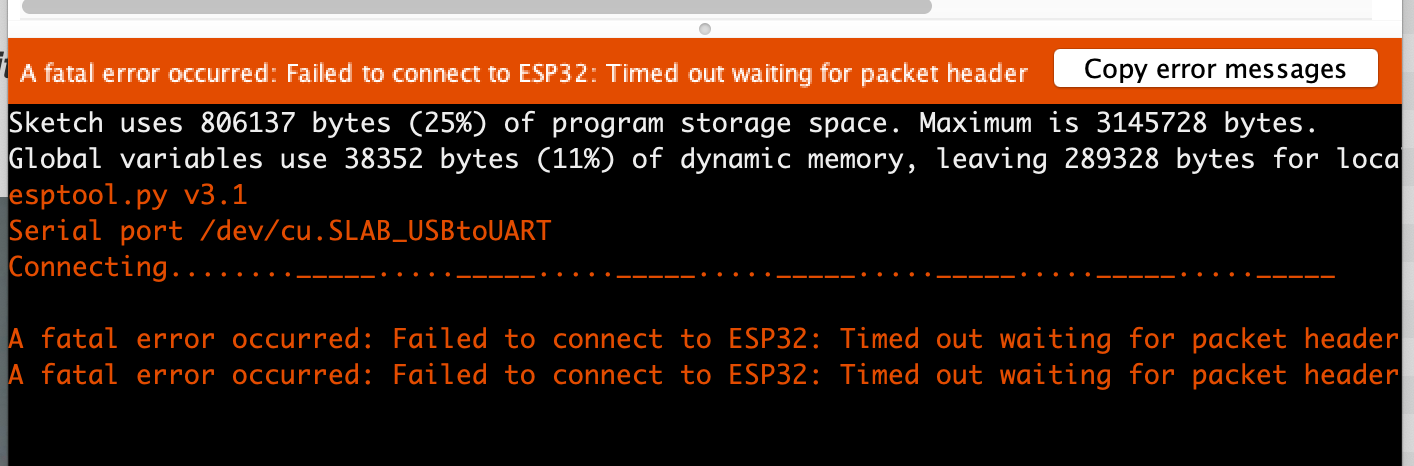
No IP address

Final product of Shanghai Tower Lightshow
Shanghai Tower light
Color Picker
Then Using this, I also decorated with two other 3D printed projects I did. The first is a collage of tall buildings in the world. The second one is the star lights.
Building Tower lights
Star Lights
Arudino code for LED strip
            *********/

// Load Wi-Fi library
#include

// Replace with your network credentials
const char* ssid     = "MAKERSPACE";
const char* password = "123456";

// Set web server port number to 80
WiFiServer server(80);

// Decode HTTP GET value
String redString = "0";
String greenString = "0";
String blueString = "0";
int pos1 = 0;
int pos2 = 0;
int pos3 = 0;
int pos4 = 0;

// Variable to store the HTTP req  uest
String header;

// Red, green, and blue pins for PWM control
const int redPin = 13;     // 13 corresponds to GPIO13
const int greenPin = 12;   // 12 corresponds to GPIO12
const int bluePin = 14;    // 14 corresponds to GPIO14

// Setting PWM frequency, channels and bit resolution
const int freq = 5000;
const int redChannel = 0;
const int greenChannel = 1;
const int blueChannel = 2;
// Bit resolution 2^8 = 256
const int resolution = 8;

// Current time
unsigned long currentTime = millis();
// Previous time
unsigned long previousTime = 0;
// Define timeout time in milliseconds (example: 2000ms = 2s)
const long timeoutTime = 2000;

void setup() {
  Serial.begin(115200);
  // configure LED PWM functionalitites
  ledcSetup(redChannel, freq, resolution);
  ledcSetup(greenChannel, freq, resolution);
  ledcSetup(blueChannel, freq, resolution);

  // attach the channel to the GPIO to be controlled
  ledcAttachPin(redPin, redChannel);
  ledcAttachPin(greenPin, greenChannel);
  ledcAttachPin(bluePin, blueChannel);

  // Connect to Wi-Fi network with SSID and password
  Serial.print("Connecting to ");
  Serial.println(ssid);
  WiFi.begin(ssid, password);
  while (WiFi.status() != WL_CONNECTED) {
    delay(500);
    Serial.print(".");
  }
  // Print local IP address and start web server
  Serial.println("");
  Serial.println("WiFi connected.");
  Serial.println("IP address: ");
  Serial.println(WiFi.localIP());
  server.begin();
}

void loop(){
  WiFiClient client = server.available();   // Listen for incoming clients

  if (client) {                             // If a new client connects,
    currentTime = millis();
    previousTime = currentTime;
    Serial.println("New Client.");          // print a message out in the serial port
    String currentLine = "";                // make a String to hold incoming data from the client
    while (client.connected() && currentTime - previousTime <= timeoutTime) {            // loop while the client's connected
      currentTime = millis();
      if (client.available()) {             // if there's bytes to read from the client,
        char c = client.read();             // read a byte, then
        Serial.write(c);                    // print it out the serial monitor
        header += c;
        if (c == '\n') {                    // if the byte is a newline character
          // if the current line is blank, you got two newline characters in a row.
          // that's the end of the client HTTP request, so send a response:
          if (currentLine.length() == 0) {
            // HTTP headers always start with a response code (e.g. HTTP/1.1 200 OK)
            // and a content-type so the client knows what's coming, then a blank line:
            client.println("HTTP/1.1 200 OK");
            client.println("Content-type:text/html");
            client.println("Connection: close");
            client.println();


            // Request sample: /?r201g32b255&
            // Red = 201 | Green = 32 | Blue = 255
            if(header.indexOf("GET /?r") >= 0) {
              pos1 = header.indexOf('r');
              pos2 = header.indexOf('g');
              pos3 = header.indexOf('b');
              pos4 = header.indexOf('&');
              redString = header.substring(pos1+1, pos2);
              greenString = header.substring(pos2+1, pos3);
              blueString = header.substring(pos3+1, pos4);
              /*Serial.println(redString.toInt());
              Serial.println(greenString.toInt());
              Serial.println(blueString.toInt());*/
              ledcWrite(redChannel, redString.toInt());
              ledcWrite(greenChannel, greenString.toInt());
              ledcWrite(blueChannel, blueString.toInt());
            }
            // Break out of the while loop
            break;
          } else { // if you got a newline, then clear currentLine
            currentLine = "";
          }
        } else if (c != '\r') {  // if you got anything else but a carriage return character,
          currentLine += c;      // add it to the end of the currentLine
        }
      }
    }
    // Clear the header variable
    header = "";
    // Close the connection
    client.stop();
    Serial.println("Client disconnected.");
    Serial.println("");
  }
}
As the ESP32 we got have the camera, so we decided to use the camera functionalities. After playing around with different ones, we decided to go with the ESP32 CAM take photos and rotate photos in web browser.
ESP32 CAM Take Photo and Display in Web Server
ESP 32 cam
Wiring
Arduino ESp32 CAM code
*********/
#include "WiFi.h"
#include "esp_camera.h"
#include "esp_timer.h"
#include "img_converters.h"
#include "Arduino.h"
#include "soc/soc.h" // Disable brownour problems
#include "soc/rtc_cntl_reg.h" // Disable brownour problems
#include "driver/rtc_io.h"
#include
#include
#include
#include
// Replace with your network credentials
const char* ssid = "REPLACE_WITH_YOUR_SSID";
const char* password = "REPLACE_WITH_YOUR_PASSWORD";
// Create AsyncWebServer object on port 80
AsyncWebServer server(80);
boolean takeNewPhoto = false;
// Photo File Name to save in SPIFFS
#define FILE_PHOTO "/photo.jpg"
// OV2640 camera module pins (CAMERA_MODEL_AI_THINKER)
#define PWDN_GPIO_NUM 32
#define RESET_GPIO_NUM -1
#define XCLK_GPIO_NUM 0
#define SIOD_GPIO_NUM 26
#define SIOC_GPIO_NUM 27
#define Y9_GPIO_NUM 35
#define Y8_GPIO_NUM 34
#define Y7_GPIO_NUM 39
#define Y6_GPIO_NUM 36
#define Y5_GPIO_NUM 21
#define Y4_GPIO_NUM 19
#define Y3_GPIO_NUM 18
#define Y2_GPIO_NUM 5
#define VSYNC_GPIO_NUM 25
#define HREF_GPIO_NUM 23
#define PCLK_GPIO_NUM 22
const char index_html[] PROGMEM = R"rawliteral(
ESP32-CAM Last Photo
It might take more than 5 seconds to capture a photo.
 )rawliteral";
void setup() {
// Serial port for debugging purposes
Serial.begin(115200);
// Connect to Wi-Fi
WiFi.begin(ssid, password);
while (WiFi.status() != WL_CONNECTED) {
delay(1000);
Serial.println("Connecting to WiFi...");
}
if (!SPIFFS.begin(true)) {
Serial.println("An Error has occurred while mounting SPIFFS");
ESP.restart();
}
else {
delay(500);
Serial.println("SPIFFS mounted successfully");
}
// Print ESP32 Local IP Address
Serial.print("IP Address: http://");
Serial.println(WiFi.localIP());
// Turn-off the 'brownout detector'
WRITE_PERI_REG(RTC_CNTL_BROWN_OUT_REG, 0);
// OV2640 camera module
camera_config_t config;
config.ledc_channel = LEDC_CHANNEL_0;
config.ledc_timer = LEDC_TIMER_0;
config.pin_d0 = Y2_GPIO_NUM;
config.pin_d1 = Y3_GPIO_NUM;
config.pin_d2 = Y4_GPIO_NUM;
config.pin_d3 = Y5_GPIO_NUM;
config.pin_d4 = Y6_GPIO_NUM;
config.pin_d5 = Y7_GPIO_NUM;
config.pin_d6 = Y8_GPIO_NUM;
config.pin_d7 = Y9_GPIO_NUM;
config.pin_xclk = XCLK_GPIO_NUM;
config.pin_pclk = PCLK_GPIO_NUM;
config.pin_vsync = VSYNC_GPIO_NUM;
config.pin_href = HREF_GPIO_NUM;
config.pin_sscb_sda = SIOD_GPIO_NUM;
config.pin_sscb_scl = SIOC_GPIO_NUM;
config.pin_pwdn = PWDN_GPIO_NUM;
config.pin_reset = RESET_GPIO_NUM;
config.xclk_freq_hz = 20000000;
config.pixel_format = PIXFORMAT_JPEG;
if (psramFound()) {
config.frame_size = FRAMESIZE_UXGA;
config.jpeg_quality = 10;
config.fb_count = 2;
} else {
config.frame_size = FRAMESIZE_SVGA;
config.jpeg_quality = 12;
config.fb_count = 1;
}
// Camera init
esp_err_t err = esp_camera_init(&config);
if (err != ESP_OK) {
Serial.printf("Camera init failed with error 0x%x", err);
ESP.restart();
}
// Route for root / web page
server.on("/", HTTP_GET, [](AsyncWebServerRequest * request) {
request->send_P(200, "text/html", index_html);
});
server.on("/capture", HTTP_GET, [](AsyncWebServerRequest * request) {
takeNewPhoto = true;
request->send_P(200, "text/plain", "Taking Photo");
});
server.on("/saved-photo", HTTP_GET, [](AsyncWebServerRequest * request) {
request->send(SPIFFS, FILE_PHOTO, "image/jpg", false);
});
// Start server
server.begin();
}
void loop() {
if (takeNewPhoto) {
capturePhotoSaveSpiffs();
takeNewPhoto = false;
}
delay(1);
}
// Check if photo capture was successful
bool checkPhoto( fs::FS &fs ) {
File f_pic = fs.open( FILE_PHOTO );
unsigned int pic_sz = f_pic.size();
return ( pic_sz > 100 );
}
// Capture Photo and Save it to SPIFFS
void capturePhotoSaveSpiffs( void ) {
camera_fb_t * fb = NULL; // pointer
bool ok = 0; // Boolean indicating if the picture has been taken correctly
do {
// Take a photo with the camera
Serial.println("Taking a photo...");
fb = esp_camera_fb_get();
if (!fb) {
Serial.println("Camera capture failed");
return;
}
// Photo file name
Serial.printf("Picture file name: %s\n", FILE_PHOTO);
File file = SPIFFS.open(FILE_PHOTO, FILE_WRITE);
// Insert the data in the photo file
if (!file) {
Serial.println("Failed to open file in writing mode");
}
else {
file.write(fb->buf, fb->len); // payload (image), payload length
Serial.print("The picture has been saved in ");
Serial.print(FILE_PHOTO);
Serial.print(" - Size: ");
Serial.print(file.size());
Serial.println(" bytes");
}
// Close the file
file.close();
esp_camera_fb_return(fb);
// check if file has been correctly saved in SPIFFS
ok = checkPhoto(SPIFFS);
} while ( !ok );
}
)rawliteral";
void setup() {
// Serial port for debugging purposes
Serial.begin(115200);
// Connect to Wi-Fi
WiFi.begin(ssid, password);
while (WiFi.status() != WL_CONNECTED) {
delay(1000);
Serial.println("Connecting to WiFi...");
}
if (!SPIFFS.begin(true)) {
Serial.println("An Error has occurred while mounting SPIFFS");
ESP.restart();
}
else {
delay(500);
Serial.println("SPIFFS mounted successfully");
}
// Print ESP32 Local IP Address
Serial.print("IP Address: http://");
Serial.println(WiFi.localIP());
// Turn-off the 'brownout detector'
WRITE_PERI_REG(RTC_CNTL_BROWN_OUT_REG, 0);
// OV2640 camera module
camera_config_t config;
config.ledc_channel = LEDC_CHANNEL_0;
config.ledc_timer = LEDC_TIMER_0;
config.pin_d0 = Y2_GPIO_NUM;
config.pin_d1 = Y3_GPIO_NUM;
config.pin_d2 = Y4_GPIO_NUM;
config.pin_d3 = Y5_GPIO_NUM;
config.pin_d4 = Y6_GPIO_NUM;
config.pin_d5 = Y7_GPIO_NUM;
config.pin_d6 = Y8_GPIO_NUM;
config.pin_d7 = Y9_GPIO_NUM;
config.pin_xclk = XCLK_GPIO_NUM;
config.pin_pclk = PCLK_GPIO_NUM;
config.pin_vsync = VSYNC_GPIO_NUM;
config.pin_href = HREF_GPIO_NUM;
config.pin_sscb_sda = SIOD_GPIO_NUM;
config.pin_sscb_scl = SIOC_GPIO_NUM;
config.pin_pwdn = PWDN_GPIO_NUM;
config.pin_reset = RESET_GPIO_NUM;
config.xclk_freq_hz = 20000000;
config.pixel_format = PIXFORMAT_JPEG;
if (psramFound()) {
config.frame_size = FRAMESIZE_UXGA;
config.jpeg_quality = 10;
config.fb_count = 2;
} else {
config.frame_size = FRAMESIZE_SVGA;
config.jpeg_quality = 12;
config.fb_count = 1;
}
// Camera init
esp_err_t err = esp_camera_init(&config);
if (err != ESP_OK) {
Serial.printf("Camera init failed with error 0x%x", err);
ESP.restart();
}
// Route for root / web page
server.on("/", HTTP_GET, [](AsyncWebServerRequest * request) {
request->send_P(200, "text/html", index_html);
});
server.on("/capture", HTTP_GET, [](AsyncWebServerRequest * request) {
takeNewPhoto = true;
request->send_P(200, "text/plain", "Taking Photo");
});
server.on("/saved-photo", HTTP_GET, [](AsyncWebServerRequest * request) {
request->send(SPIFFS, FILE_PHOTO, "image/jpg", false);
});
// Start server
server.begin();
}
void loop() {
if (takeNewPhoto) {
capturePhotoSaveSpiffs();
takeNewPhoto = false;
}
delay(1);
}
// Check if photo capture was successful
bool checkPhoto( fs::FS &fs ) {
File f_pic = fs.open( FILE_PHOTO );
unsigned int pic_sz = f_pic.size();
return ( pic_sz > 100 );
}
// Capture Photo and Save it to SPIFFS
void capturePhotoSaveSpiffs( void ) {
camera_fb_t * fb = NULL; // pointer
bool ok = 0; // Boolean indicating if the picture has been taken correctly
do {
// Take a photo with the camera
Serial.println("Taking a photo...");
fb = esp_camera_fb_get();
if (!fb) {
Serial.println("Camera capture failed");
return;
}
// Photo file name
Serial.printf("Picture file name: %s\n", FILE_PHOTO);
File file = SPIFFS.open(FILE_PHOTO, FILE_WRITE);
// Insert the data in the photo file
if (!file) {
Serial.println("Failed to open file in writing mode");
}
else {
file.write(fb->buf, fb->len); // payload (image), payload length
Serial.print("The picture has been saved in ");
Serial.print(FILE_PHOTO);
Serial.print(" - Size: ");
Serial.print(file.size());
Serial.println(" bytes");
}
// Close the file
file.close();
esp_camera_fb_return(fb);
// check if file has been correctly saved in SPIFFS
ok = checkPhoto(SPIFFS);
} while ( !ok );
}